View的绘制流程

Android 中 Activity 是作为应用程序的载体存在,代表着一个完整的用户界面,提供了一个窗口来绘制各种视图,当 Activity 启动时,我们会通过 setContentView 方法来设置一个内容视图,这个内容视图就是用户看到的界面。

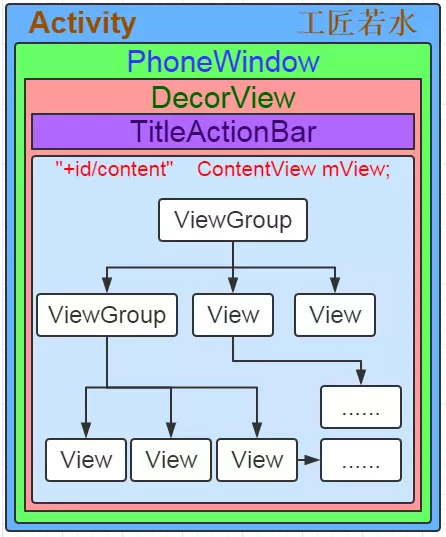
PhoneWindow 是 Android 系统中最基本的窗口系统,每个 Activity 会创建一个。PhoneWindow 是 Activity 和 View 系统交互的借口。DecorView 本质上是一个 FrameLayout,是 Activity 中所有 View 的祖先。

绘制的整体流程

当一个应用启动时,会启动一个主 Activity,Android 系统会根据 Activity 的布局来对它进行绘制。绘制会从根视图 ViewRoot 的 performTraversals() 方法开始,从上到下遍历整个视图树,每个 View 控制负责绘制自己,而 ViewGroup 还需要负责通知自己的子 View 进行绘制操作。视图操作的过程可以分为三个步骤,分别是测量(Measure)、布局(Layout)和绘制(Draw)。performTraversals 方法在类 ViewRootImpl 内,其核心代码如下。

1
2
3
4
5
6
7
8
9
10
11
int childWidthMeasureSpec = getRootMeasureSpec(mWidth, lp.width);
int childHeightMeasureSpec = getRootMeasureSpec(mHeight, lp.height);
...
// 测量
performMeasure(childWidthMeasureSpec, childHeightMeasureSpec);
...
// 布局
performLayout(lp, mWidth, mHeight);
...
// 绘制
performDraw();

MeasureSpec

MeasureSpec 表示的是一个 32 位的整数值,它的高 2 位表示测量模式 SpecMode,低 30 位表示某种测量模式下的规格大小 SpecSize。MeasureSpec 是 View 类的一个静态内部类,用来说明应该如何测量这个View。
三种测量模式。

  • UNSPECIFIED:不指定测量模式,父视图没有限制子视图的大小,子视图可以是想要的任何尺寸,通常用于系统内部,应用开发中很少使用到。
  • EXACTLY:精确测量模式,当该视图的 layout_width 或者 layout_height 指定为具体数值或者 match_parent 时生效,表示父视图已经决定了子视图的精确大小,这种模式下 View 的测量值就是 SpecSize 的值。
  • AT_MOST:最大值模式,当前视图的 layout_width 或者 layout_height 指定为 wrap_content 时生效,此时子视图的尺寸可以是不超过父视图运行的最大尺寸的任何尺寸。

对 DecorView 而言,它的 MeasureSpec 由窗口尺寸和其自身的 LayoutParams 共同决定;对于普通的 View,它的 MeasureSpec 由父视图的 MeasureSpec 和其本身的 LayoutParams 共同决定。

Measure

Measure 用来计算 View 的实际大小。页面的测量流程从 performMeasure 方法开始。

1
2
3
4
5
6
7
8
9
10
11
private void performMeasure(int childWidthMeasureSpec, int childHeightMeasureSpec) {
if (mView == null) {
return;
}
Trace.traceBegin(Trace.TRACE_TAG_VIEW, "measure");
try {
mView.measure(childWidthMeasureSpec, childHeightMeasureSpec);
} finally {
Trace.traceEnd(Trace.TRACE_TAG_VIEW);
}
}

具体操作是分发给 ViewGroup 的,由 ViewGroup 在它的 measureChild 方法中传递给子 View。ViewGroup 通过遍历自身所有的子 View,并逐个调用子 View 的 measure 方法实现测量操作。

1
2
3
4
5
6
7
8
9
10
11
12
13
14
15
16
17
18
19
20
21
22
23
24
// 遍历测量 ViewGroup 中所有的 View
protected void measureChildren(int widthMeasureSpec, int heightMeasureSpec) {
final int size = mChildrenCount;
final View[] children = mChildren;
for (int i = 0; i < size; ++i) {
final View child = children[i];
if ((child.mViewFlags & VISIBILITY_MASK) != GONE) {
measureChild(child, widthMeasureSpec, heightMeasureSpec);
}
}
}

// 测量某个指定的 View
protected void measureChild(View child, int parentWidthMeasureSpec,
int parentHeightMeasureSpec) {
final LayoutParams lp = child.getLayoutParams();

final int childWidthMeasureSpec = getChildMeasureSpec(parentWidthMeasureSpec,
mPaddingLeft + mPaddingRight, lp.width);
final int childHeightMeasureSpec = getChildMeasureSpec(parentHeightMeasureSpec,
mPaddingTop + mPaddingBottom, lp.height);

child.measure(childWidthMeasureSpec, childHeightMeasureSpec);
}

View (ViewGroup) 的 Measure 方法,最终的测量是通过回调 onMeasure 方法实现的,这个通常由 View 的特定子类自己实现,可以通过重写这个方法实现自定义 View。

1
2
3
4
5
6
7
8
9
10
11
12
13
14
15
16
17
18
19
20
21
22
23
24
25
26
27
28
29
public final void measure(int widthMeasureSpec, int heightMeasureSpec) {
...
onMeasure(widthMeasureSpec, heightMeasureSpec);
....
}

// 如果需要自定义测量,子类需重写这个方法
protected void onMeasure(int widthMeasureSpec, int heightMeasureSpec) {
setMeasuredDimension(getDefaultSize(getSuggestedMinimumWidth(), widthMeasureSpec),
getDefaultSize(getSuggestedMinimumHeight(), heightMeasureSpec));
}

// 如果 View 没有重写onMeasure 方法,默认会直接调用 getDefaultSize
public static int getDefaultSize(int size, int measureSpec) {
int result = size;
int specMode = MeasureSpec.getMode(measureSpec);
int specSize = MeasureSpec.getSize(measureSpec);

switch (specMode) {
case MeasureSpec.UNSPECIFIED:
result = size;
break;
case MeasureSpec.AT_MOST:
case MeasureSpec.EXACTLY:
result = specSize;
break;
}
return result;
}

Layout

Layout 过程用来确定 View 在父容器的布局位置,他是父容器获取子 View 的位置参数后,调用子 View 的 layout 方法并将位置参数传入实现的。ViewRootImpl 的 performLayout 代码如下。

1
2
3
4
5
6
private void performLayout(WindowManager.LayoutParams lp, int desiredWindowWidth,
int desiredWindowHeight) {
...
host.layout(0, 0, host.getMeasuredWidth(), host.getMeasuredHeight());
...
}

View 的 layout 方法代码。

1
2
3
4
5
6
7
public void layout(int l, int t, int r, int b) {
onLayout(changed, l, t, r, b);
}

// 空方法,子类如果是 ViewGroup 类型,则重写这个方法,实现 ViewGroup 中所有 View 控件布局
protected void onLayout(boolean changed, int left, int top, int right, int bottom) {
}

Draw

Draw 操作用来将控件绘制出来,绘制的流程从 performDraw 方法开始。performDraw 方法在类 ViewRootImpl 内,其核心代码如下。

1
2
3
4
5
6
7
8
9
10
11
12
13
14
15
16
17
18
private void performDraw() {
boolean canUseAsync = draw(fullRedrawNeeded);
}

private boolean draw(boolean fullRedrawNeeded) {
...
if (!drawSoftware(surface, mAttachInfo, xOffset, yOffset,
scalingRequired, dirty, surfaceInsets)) {
return false;
}
}

private boolean drawSoftware(Surface surface, AttachInfo attachInfo, int xoff, int yoff,
boolean scalingRequired, Rect dirty, Rect surfaceInsets) {
...
mView.draw(canvas);
...
}

最终调用到每个 View 的 draw 方法绘制每个具体的 View,绘制基本上可以分为六个步骤。

1
2
3
4
5
6
7
8
9
10
11
12
13
14
15
16
17
18
19
20
21
22
23
24
public void draw(Canvas canvas) {
...
// Step 1, draw the background, if needed
if (!dirtyOpaque) {
drawBackground(canvas);
}
...
// Step 2, save the canvas' layers
saveCount = canvas.getSaveCount();
...
// Step 3, draw the content
if (!dirtyOpaque) onDraw(canvas);

// Step 4, draw the children
dispatchDraw(canvas);

// Step 5, draw the fade effect and restore layers
canvas.drawRect(left, top, right, top + length, p);
...
canvas.restoreToCount(saveCount);
...
// Step 6, draw decorations (foreground, scrollbars)
onDrawForeground(canvas);
}
坚持原创技术分享,您的支持将鼓励我继续创作!