AndroidView的绘制流程

本文主要是梳理 View 绘制的整体流程,帮助开发者对 View 的绘制有一个更深层次的理解。

整体流程

View 绘制中主要流程分为measure,layout, draw 三个阶段。

  • measure :根据父 view 传递的 MeasureSpec 进行计算大小。
  • layout :根据 measure 子 View 所得到的布局大小和布局参数,将子View放在合适的位置上。
  • draw :把 View 对象绘制到屏幕上。

那么发起绘制的入口在哪里呢?
在介绍发起绘制的入口之前,我们需要先了解Window,ViewRootImpl,DecorView之间的联系。

一个 Activity 包含一个Window,Window是一个抽象基类,是 Activity 和整个 View 系统交互的接口,只有一个子类实现类PhoneWindow,提供了一系列窗口的方法,比如设置背景,标题等。一个PhoneWindow 对应一个 DecorView 跟 一个 ViewRootImpl,DecorView 是ViewTree 里面的顶层布局,是继承于FrameLayout,包含两个子View,一个id=statusBarBackground 的 View 和 LineaLayout,LineaLayout 里面包含 title 跟 content,title就是平时用的TitleBar或者ActionBar,contenty也是 FrameLayout,activity通过 setContent()加载布局的时候加载到这个View上。ViewRootImpl 就是建立 DecorView 和 Window 之间的联系。

这三个阶段的核心入口是在 ViewRootImpl 类的 performTraversals() 方法中。

1
2
3
4
5
6
7
8
9
10
11
12
private void performTraversals() {
......
int childWidthMeasureSpec = getRootMeasureSpec(mWidth, lp.width);
int childHeightMeasureSpec = getRootMeasureSpec(mHeight, lp.height);
......
mView.measure(childWidthMeasureSpec, childHeightMeasureSpec);
......
mView.layout(0, 0, mView.getMeasuredWidth(), mView.getMeasuredHeight());
......
mView.draw(canvas);
......
}

在源码中这个方法贼长,但是核心还是这三个步骤,就是判断根据之前的状态判断是否需要重新 measure,是否需要重新 layout ,是否需要重新 draw。

measureSpeac

在介绍 measure 方法之前,需要了解一个很核心的概念:measureSpeac 。在 Google 官方文档中是这么定义 measureSpeac 的

A MeasureSpec encapsulates the layout requirements passed from parent to child. Each MeasureSpec represents a requirement for either the width or the height. A MeasureSpec is comprised of a size and a mode.
大概意思是:MeasureSpec 封装了从父View 传递给到子View的布局需求。每个MeasureSpec代表宽度或高度的要求。每个MeasureSpec都包含了size(大小)和mode(模式)。

我觉得这是measureSpeac 最好的解释了。

后面两句不难理解。MeasureSpec 一个32位二进制的整数型,前面2位代表的是mode,后面30位代表的是size。mode 主要分为3类,分别是

  • EXACTLY:父容器已经测量出子View的大小。对应是 View 的LayoutParams的match_parent 或者精确数值。

  • AT_MOST:父容器已经限制子view的大小,View 最终大小不可超过这个值。对应是 View 的LayoutParams的wrap_content

  • UNSPECIFIED:父容器不对View有任何限制,要多大给多大,这种情况一般用于系统内部,表示一种测量的状态。(这种不怎么常用,下面分析也会直接忽略这种情况)

封装了从父 View 传递给到子 View 的布局需求,这句话又怎么理解呢?

View 的 MeasureSpec 并不是父 View 独自决定,它是根据父 view 的MeasureSpec加上子 View 的自己的 LayoutParams,通过相应的规则转化。

看代码:

View 测量流程是父 View 先测量子 View,等子 View 测量完了,再来测量自己。在ViewGroup 测量子 View 的入口就是 measureChildWithMargins

1
2
3
4
5
6
7
8
9
10
11
12
13
14
15
16
17
18
19
20
21
22
23
24
25
26
27
28
29
30
31
32
33
34
35
36
37
38
39
40
41
42
43
44
45
46
47
48
49
50
51
52
53
54
55
56
57
58
59
60
61
62
63
64
65
66
67
68
69
70
71
72
73
74
75
76
77
78
79
80
81
82
83
84
85
86
87
88
89
90
91
92
protected void measureChildWithMargins(View child,
int parentWidthMeasureSpec, int widthUsed,
int parentHeightMeasureSpec, int heightUsed) {

//获取子View的LayoutParam
final MarginLayoutParams lp = (MarginLayoutParams) child.getLayoutParams();
//通过父View的MeasureSpec和子View的margin,父View的padding计算,算出子View的MeasureSpec
final int childWidthMeasureSpec = getChildMeasureSpec(parentWidthMeasureSpec,
mPaddingLeft + mPaddingRight + lp.leftMargin + lp.rightMargin
+ widthUsed, lp.width);
final int childHeightMeasureSpec = getChildMeasureSpec(parentHeightMeasureSpec,
mPaddingTop + mPaddingBottom + lp.topMargin + lp.bottomMargin
+ heightUsed, lp.height);
//通过计算出来的MeasureSpec,让子View自己测量。
child.measure(childWidthMeasureSpec, childHeightMeasureSpec);
}


public static int getChildMeasureSpec(int spec, int padding, int childDimension) {
int specMode = MeasureSpec.getMode(spec);
int specSize = MeasureSpec.getSize(spec);
//计算子View的大小
int size = Math.max(0, specSize - padding);

int resultSize = 0;
int resultMode = 0;

switch (specMode) {
// 父View是EXACTLY的
case MeasureSpec.EXACTLY:
//子View的width或height是个精确值,则size为精确值,mode为 EXACTLY
if (childDimension >= 0) {
resultSize = childDimension;
resultMode = MeasureSpec.EXACTLY;
//子View的width或height是MATCH_PARENT,则size为父视图大小,mode为 EXACTLY
} else if (childDimension == LayoutParams.MATCH_PARENT) {
// Child wants to be our size. So be it.
resultSize = size;
resultMode = MeasureSpec.EXACTLY;
//子View的width或height是WRAP_CONTENT,则size为父视图大小,mode为 AT_MOST
} else if (childDimension == LayoutParams.WRAP_CONTENT) {
// Child wants to determine its own size. It can't be
// bigger than us.
resultSize = size;
resultMode = MeasureSpec.AT_MOST;
}
break;

// 2、父View是AT_MOST的
case MeasureSpec.AT_MOST:
//子View的width或height是个精确值,则size为精确值,mode为 EXACTLY
if (childDimension >= 0) {
// Child wants a specific size... so be it
resultSize = childDimension;
resultMode = MeasureSpec.EXACTLY;
//子View的width或height是MATCH_PARENT,则size为父视图大小,mode为 AT_MOST
} else if (childDimension == LayoutParams.MATCH_PARENT) {
// Child wants to be our size, but our size is not fixed.
// Constrain child to not be bigger than us.
resultSize = size;
resultMode = MeasureSpec.AT_MOST;
//子View的width或height是MATCH_PARENT,则size为父视图大小,mode为 AT_MOST
} else if (childDimension == LayoutParams.WRAP_CONTENT) {
// Child wants to determine its own size. It can't be
// bigger than us.
resultSize = size;
resultMode = MeasureSpec.AT_MOST;
}
break;

// 父View是UNSPECIFIED的
case MeasureSpec.UNSPECIFIED:
if (childDimension >= 0) {
// Child wants a specific size... let him have it
resultSize = childDimension;
resultMode = MeasureSpec.EXACTLY;
} else if (childDimension == LayoutParams.MATCH_PARENT) {
// Child wants to be our size... find out how big it should
// be
resultSize = View.sUseZeroUnspecifiedMeasureSpec ? 0 : size;
resultMode = MeasureSpec.UNSPECIFIED;
} else if (childDimension == LayoutParams.WRAP_CONTENT) {
// Child wants to determine its own size.... find out how
// big it should be
resultSize = View.sUseZeroUnspecifiedMeasureSpec ? 0 : size;
resultMode = MeasureSpec.UNSPECIFIED;
}
break;
}
//noinspection ResourceType
return MeasureSpec.makeMeasureSpec(resultSize, resultMode);
}

通过代码我们很可以很看到 View 的子 View 的 MeasureSpec 转化规则,但是感觉可能有点懵,我们用一个”商城-衣服”例子来比喻一下:

我们把父 View 看做成商城,子 View 看做成衣服,EXACTLY / MATCH_PARENT 看做成高档品牌,AT_MOST / WRAP_CONTENT 看做成杂牌,精确值看做成价格,View的大小看做价格。

  • 如果是衣服(子 View)产地是高档品牌(LayoutParams = LayoutParams.MATCH_PARENT),商城是(父 View)高档的商城(EXACTLY),那么衣服的价格(size 大小)就会根据高档商城价格来定,能有多高就卖多高(View的大小取决于父View大小)。

  • 如果是衣服(子 View)产地是高档品牌(LayoutParams = LayoutParams.MATCH_PARENT),商城是(父 View)杂牌的商城(AT_MOST),那么衣服的价格(size 大小)也会根据低档商城价格来定,太高普通人也买不起呀(View的大小取决于父View大小)。

  • 如果是衣服(子 View)产地是杂牌(LayoutParams = LayoutParams.WRAP_CONTENT),商城是(父 View)高档的商城(EXACTLY),那么衣服的价格(size 大小)也会根据高档商城价格来定,能有多高就卖多高,毕竟店大欺人,绝不打折(View的大小取决于父View大小)。

  • 如果是衣服(子 View)产地是杂牌(LayoutParams = LayoutParams.WRAP_CONTENT),商城是(父 View)杂牌的商城(AT_MOST),那么衣服的价格(size 大小)就会根据低档商城价格来定,小巷步行街不都是这样卖的吗(View的大小取决于父View大小)

  • 如果是衣服(子 View)已经全国明码标价(android:layout_xxxx=”200dp”),商城是(父 View)无论是杂牌的商城(AT_MOST)还是高档的商城(EXACTLY),那么衣服的价格(size 大小)就不会变的。,不然打你小屁屁。

如果你觉得例子真的糟糕透了,那么看以下一表正经总结:

一表正经总结以下:

  • 当父View的mode是EXACTLY的时候:说明父View的大小是确定的

    • 子View的宽或高是MATCH_PARENT:
    • 子View的宽或高是WRAP_CONTENT:子View是包裹布局,说明子View的大小还不确定,所以子View最大不能超过父View的大小mode=AT_MOST。
    • 子View的宽或高是具体数值:子viewd大小已经固定了,子View的大小就是固定这个数值,mode=EXACTLY。
  • 当父View的mode是AT_MOST的时候:说明父View大小是不确定的。

    • 子View的宽或高是MATCH_PARENT:父View大小是不确定的,子View是填充布局情况,也不能确定大小,所以View大小不能超过父View的大小,mode=AT_MOST
    • 子View的宽或高是WRAP_CONTENT:子View是包裹布局,大小不能超过父View的大小,mode=AT_MOST。
    • 子View的宽或高是具体数值:子viewd大小已经固定了,子View的大小就是固定这个数值,mode=EXACTLY。

需要注意一点就是,此时的MeasureSpec并不是View真正的大小,只有setMeasuredDimension之后才能真正确定View的大小。

measure

measure 主要功能就是测量设置 View 的大小。该方法是 final 类型,子类不能覆盖,在方法里面会调用 onMeasure(),我们可以复写 onMeasure() 方法去测量设置 View 的大小。

1
2
3
4
5
6
7
public final void measure(int widthMeasureSpec, int heightMeasureSpec) {
/*-----------省略代码---------------*

onMeasure(widthMeasureSpec, heightMeasureSpec);

/*-----------省略代码---------------*/
}

在 onMeasure( ) 方法中

1
2
3
4
protected void onMeasure(int widthMeasureSpec, int heightMeasureSpec) {
setMeasuredDimension(getDefaultSize(getSuggestedMinimumWidth(), widthMeasureSpec),
getDefaultSize(getSuggestedMinimumHeight(), heightMeasureSpec));
}

onMeasure( ) 方法就是执行测量设置 View 代码的核心所在。

我们先来看下 getSuggestedMinimumWidth()

1
2
3
4
protected int getSuggestedMinimumWidth() {
//返回建议 View 设置最小值宽度
return (mBackground == null) ? mMinWidth : max(mMinWidth, mBackground.getMinimumWidth());
}

这里返回的建议最小值就是我们xml 布局中用的属性 minWidth或者是背景大小。

同理可得 getSuggestedMinimumHeight()。

看下 getDefaultSize

主要作用就是根据View的建议最小值,结合父View传递的measureSpec,得出并返回measureSpec

看代码

1
2
3
4
5
6
7
8
9
10
11
12
13
14
15
16
17
18
    public static int getDefaultSize(int size, int measureSpec) {
int result = size;
//获取父View传递过来的模式
int specMode = MeasureSpec.getMode(measureSpec);
//获取父View传递过来的大小
int specSize = MeasureSpec.getSize(measureSpec);

switch (specMode) {
case MeasureSpec.UNSPECIFIED:
result = size;//View的大小父View未定,设置为建议最小值
break;
case MeasureSpec.AT_MOST:
case MeasureSpec.EXACTLY:
result = specSize;
break;
}
return result;
}

getDefaultSize 的逻辑跟我们之前分析的 MeasureSpec 转化规则非常相似。就是根据specMode设置大小。如果specMode是UNSPECIFIED 未确定大小,则会使用建议最小值,如果其他两种情况,则使用父View传递过来的大小。再次强调:并不是父View 独自决定,它是根据父 view 的MeasureSpec加上子vIew的自己的LayoutParams,通过相应的规则转化而得到的大小。

再来看下 setMeasuredDimension

setMeasuredDimension 作用就是将测量好的宽跟高进行存储。在onMeasure() 必须调用这个方法,不然就会抛出 IllegalStateException 异常。

我们重新梳理一下刚才那些流程:

在measure 方法,核心就是调用onMeasure( ) 进行View的测量。在onMeasure( )里面,获取到最小建议值,如果父类传递过来的模式是MeasureSpec.UNSPECIFIED,也就是父View大小未定的情况下,使用最小建议值,如果是AT_MOST或者EXACTLY模式,则设置父类传递过来的大小,然后调用setMeasuredDimension 方法进行存储大小。

layout()

作用描述
measure() 方法中我们已经测量出View的大小,根据这些大小,我们接下来就需要确定 View 在父 View 的位置进行排版布局,这就是layout 作用。
对 View 进行排版布局,还是要看父 View,也就是 ViewGroup。

看代码

1
2
3
4
5
6
7
8
9
10
11
12
@Override
public final void layout(int l, int t, int r, int b) {
if (!mSuppressLayout && (mTransition == null || !mTransition.isChangingLayout())) {
if (mTransition != null) {
mTransition.layoutChange(this);
}
super.layout(l, t, r, b);
} else {
// record the fact that we noop'd it; request layout when transition finishes
mLayoutCalledWhileSuppressed = true;
}
}

代码不多,大致作用就是判断 View 是否在执行动画,如果是在执行动画,则等待动画执行完调用 requestLayout(),如果没有添加动画或者动画已经执行完了,则调用 layout(),也就是调用View的 layout()。

1
2
3
4
5
6
7
8
9
10
11
12
13
14
15
16
17
18
19
20
21
22
23
24
25
26
27
28
29
30
31
32
public void layout(int l, int t, int r, int b) {

/*-----------省略代码---------------*/
boolean changed = isLayoutModeOptical(mParent) ?
setOpticalFrame(l, t, r, b) : setFrame(l, t, r, b);

if (changed || (mPrivateFlags & PFLAG_LAYOUT_REQUIRED) == PFLAG_LAYOUT_REQUIRED) {
onLayout(changed, l, t, r, b);

if (shouldDrawRoundScrollbar()) {
if(mRoundScrollbarRenderer == null) {
mRoundScrollbarRenderer = new RoundScrollbarRenderer(this);
}
} else {
mRoundScrollbarRenderer = null;
}

mPrivateFlags &= ~PFLAG_LAYOUT_REQUIRED;

ListenerInfo li = mListenerInfo;
if (li != null && li.mOnLayoutChangeListeners != null) {
ArrayList<OnLayoutChangeListener> listenersCopy =
(ArrayList<OnLayoutChangeListener>)li.mOnLayoutChangeListeners.clone();
int numListeners = listenersCopy.size();
for (int i = 0; i < numListeners; ++i) {
listenersCopy.get(i).onLayoutChange(this, l, t, r, b, oldL, oldT, oldR, oldB);
}
}
}

/*-----------省略代码---------------*/
}

View 的 layout 的方法也是非常长。大致作用就是设置 View 的在父 View 的位置,然后判断位置是否发生变化,是否需要重新调用排版布局,如果是需要重新布局则用了 onLayout()方法。
在OnLayout 方法中,View 里面是一个空实现,而 ViewGroup 则是一个抽象方法。为什么这么设计呢?因为onLayout中主要就是为了给遍历View然后进行排版布局,分别设置View在父View中的位置。既然如此,那么View的意义就不大了,而ViewGruo 必须实现,不然没法对子View进行布局。那么如何对 View 进行排版呢?举例个简单的demo。

1
2
3
4
5
6
7
8
9
10
11
12
13
protected void onLayout(boolean changed,
int l, int t, int r, int b) {

int childCount = getChildCount();
for (
int i = 0;
i < childCount; i++)

{
View child = getChildAt(i);
child.layout(l, t, r, b);
}
}

就是遍历所有的子 View 然后调用 child.layout(l, t, r, b)。

大家有兴趣也可以参考一下 FrameLayout, LinearLayout这类布局。

draw()

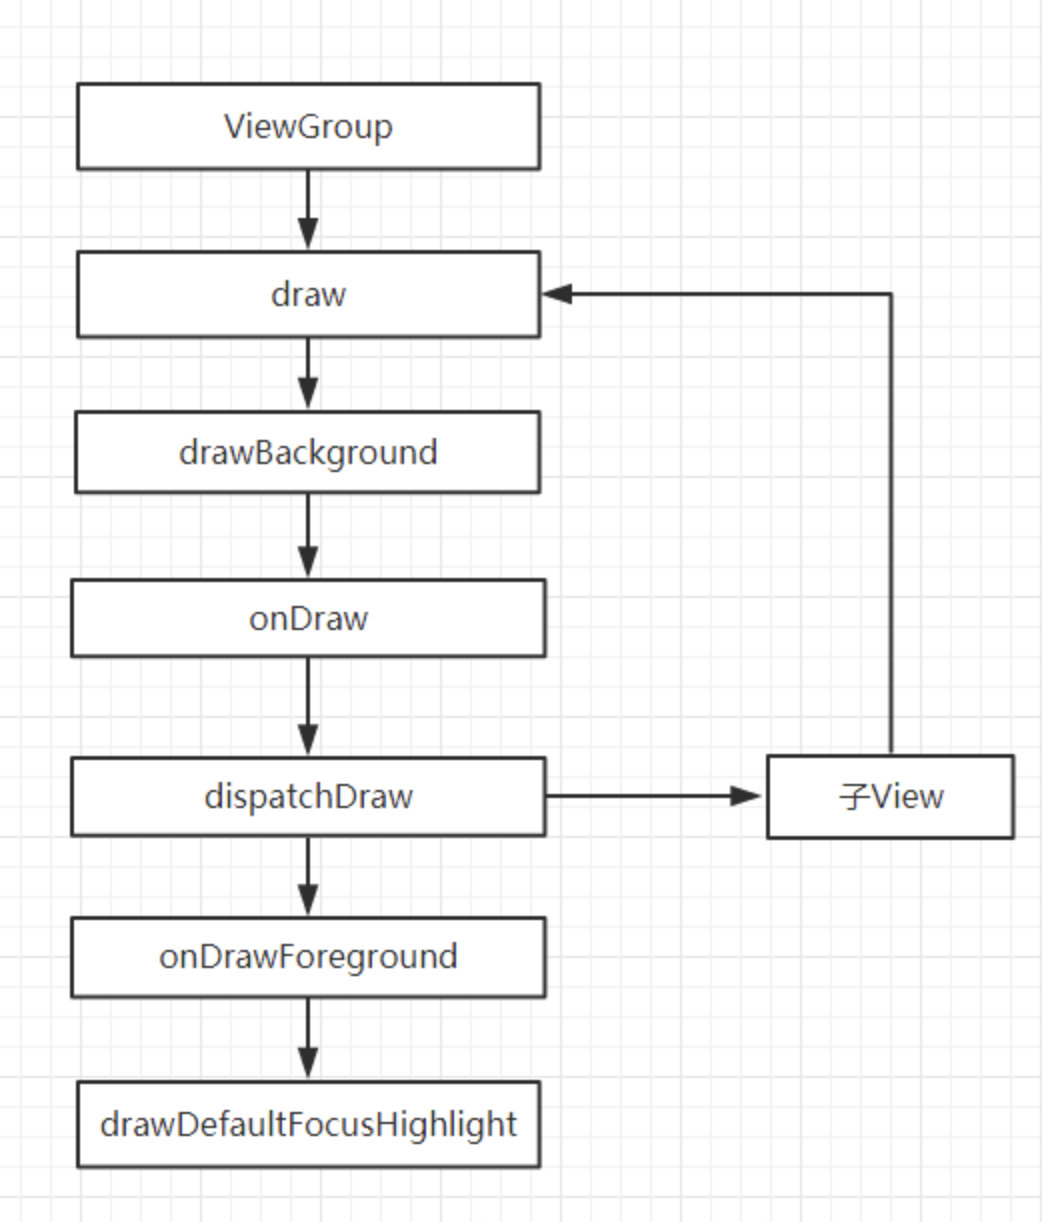
经过前面两部的测量跟布局之后,接下来就是绘制了,也就是真正把 View 绘制在屏幕可见视图上。draw()作用就是绘制View 的背景,内容,绘制子View,还有前景跟滚动条。看下 View 的draw() 源码

1
2
3
4
5
6
7
8
9
10
11
12
13
14
15
16
17
18
19
20
21
22
23
24
25
26
27
28
29
30
31
32
33
34
35
@CallSuper
public void draw(Canvas canvas) {

/*-----------省略代码---------------*/
// Step 1, draw the background, if needed
int saveCount;

if (!dirtyOpaque) {
drawBackground(canvas);
}

/*-----------省略代码---------------*/
if (!verticalEdges && !horizontalEdges) {
// Step 3, draw the content
if (!dirtyOpaque) onDraw(canvas);

// Step 4, draw the children
dispatchDraw(canvas);

drawAutofilledHighlight(canvas);

// Overlay is part of the content and draws beneath Foreground
if (mOverlay != null && !mOverlay.isEmpty()) {
mOverlay.getOverlayView().dispatchDraw(canvas);
}

// Step 6, draw decorations (foreground, scrollbars)
onDrawForeground(canvas);

// Step 7, draw the default focus highlight
drawDefaultFocusHighlight(canvas);

/*-----------省略代码---------------*/
return;
}

draw 过程中一共分成7步,其中两步我们直接直接跳过不分析了。

第一步:drawBackground(canvas): 作用就是绘制 View 的背景。

第二步:onDraw(canvas) :绘制 View 的内容。View 的内容是根据自己需求自己绘制的,所以方法是一个空方法,View的继承类自己复写实现绘制内容。

第三步:dispatchDraw(canvas):遍历子View进行绘制内容。在 View 里面是一个空实现,ViewGroup 里面才会有实现。在自定义 ViewGroup 一般不用复写这个方法,因为它在里面的实现帮我们实现了子 View 的绘制过程,基本满足需求。

第四步:onDrawForeground(canvas):对前景色跟滚动条进行绘制。

第五步:drawDefaultFocusHighlight(canvas):绘制默认焦点高亮。

好了,整个绘制流程就分析完毕了!

坚持原创技术分享,您的支持将鼓励我继续创作!