讲完了常用的部件和网络请求后,差不多该进入整体实战了,这里我们将写一个比较熟悉的项目,郭神的 cool weather。项目将使用 fluro 实现路由管理,dio 实现网络请求,rxdart 实现 BLoC 进行状态管理和逻辑分离,使用文件,shared_preferences,sqflite 实现本地的数据持久化。这边先给出项目的地址:flutter_weather,以及最后实现的效果图:
| One | Two | Three |
|---|---|---|
 |
 |
 |
除了 fluro 别的基本上前面都讲了,所以在开始正式的实战前,先讲下 fluro
Fluro
fluro 是对 Navigator 的一个封装,方便更好的管理路由跳转,当然还存在一些缺陷,例如目前只支持传递字符串,不能传递中文等,但是这些问题都算不上是大问题。
fluro 的使用很简单,大概分如下的步骤:
在全局定义一个
Router实例1
final router = Router();
使用
Router实例定义路径和其对应的Handler对象1
2
3
4
5
6
7
8
9
10
11
12// 例如定义一个 CityPage 的路径和 Handler
Handler cityHandler = Handler(handlerFunc: (_, params) {
// 传递的参数都在 params 中,params 是一个 Map<String, List<String>> 类型参数
String cityId = params['city_id']?.first;
return BlocProvider(child: WeatherPage(city: cityId), bloc: WeatherBloc());
});
// 定义路由的路径和参数
// 需要注意的是,第一个页面的路径必须为 "/",别的可为 "/" + 任意拼接
router.define('/city', handler: cityHandler);
// 或者官方提供的另一种方式
router.define('/city/:city_id', handler: cityHandler);将
router注册到MaterialApp的onGenerateRoute中1
MaterialApp(onGenerateRoute: router);
最后通过
Router实例进行跳转,如果有参数传递则会在新的页面收到1
2
3router.navigateTo(context, '/city?city_id=CN13579');
// 或者官方的方式
router.navigateTo(context, '/city/CN13579');
在 fluro 中提供了多种路由动画,包括 fadeIn,inFromRight 等。讲完了使用,就进入实战了。
flutter_weather 实战
导入插件
在开始的时候,已经提到了整体功能的实现需求,所以这边需要导入的插件以及存放图片的文件夹如下:
1 | dependencies: |
顶层静态实例的实现
有许多实例需要在顶层注册,然后在全局使用,包括但不限于 fluro 的 router,http,database 等等。在这个项目中,需要用到的就是这三个实例,会在全局调用,所以在开始前进行初始化,当然 http 和 database 在使用的时候创建也可以,完全看个人习惯,但是 fluro 的管理类必须在一开始就注册完成。首先需要定义一个 Application 类用来存放这些静态实例
1 | class Application { |
接着就是对相应方法类的编写,其中 HttpUtil 和 DatabaseUtils 在前面有讲过,这边不重复讲,会讲下数据库如何建立。
Fluro 路由管理类
首先,需要知道,该项目的界面大概分如下的界面(当然可先只定义首页,剩下用到了再定义,该项目相对简单,所以先列出来):省选择页,市选择页,区选择页,天气展示页,设置页。所以 fluro 的管理类可按如下定义:
1 | // 查看 `routers/routers.dart` 文件 |
那么界面的路由到这就编写好了,但是前面提到了 fluro 目前不支持中文的传递,所以在传递中文时候,需要先进行转码,这边提供一个自己写的方法,小伙伴有更好的方法也可以直接在项目提 issue
1 | /// 查看 `utils/fluro_convert_util.dart` 文件 |
Database 管理类编写
因为数据库的开启是一个很耗资源的过程,所以这边通过单例并提取到顶层。在该项目中,数据库主要用于存储城市信息,因为城市之间的关联比较复杂,如果通过 shared_preferences 或者文件存储会很复杂。
1 | /// 查看 `utils/db_utils.dart` 文件 |
定义完全局使用的方法,就可以在 main 函数中进行相关的初始化了
1 | /// 查看 `main.dart` 文件 |
初始化完毕,接着就可以进行页面的编写了。
首页编写
首页主要是为了对 App 的一个大概展示,或者是一些广告的展示,同时也给一些数据初始化提供时间,当用户进入后有更好的体验效果。我们在这里就做一个图标的展示(图标可自行到项目中 images 文件夹查找),延时 5s 后跳转下个页面。
1 | /// 查看 `splash_page.dart` 文件 |
城市选择页面
当首次进入的时候,用户肯定没有选择城市,所以先编写城市选择列表页面,因为整体的项目使用 BLoC 分离业务逻辑和页面,所以先编写数据管理类吧,把数据请求和改变的业务逻辑放到这块,BLoC 的实现在前面讲过了,这边就不重复提了。
1 | /// 查看 `provinces_bloc.dart` 文件 |
写完 BLoC 需要对其进行注册,因为城市选择相对还是比较频繁的,所以可以放最顶层进行注册
1 | return BlocProvider( |
城市选择就是一个列表,直接通过 ListView 生成即可,前面讲 ListView 的时候提到,尽可能固定 item 的高度,会提高绘制效率
1 | /// 查看 `provinces_page.dart` 文件 |
对于市和区的列表选择也类似,除了最后的点击会有些区别页面的布局几乎一致,这边只提下点击事件
1 | /// 查看 `cities_page.dart` 文件 |
天气详情页面
天气详情页面相对部件会多点,为了看着舒服一点,这里拆成多个部分来编写,在这之前还是先编写数据的管理类,因为天气详情接口返回的数据嵌套层次比较多,关系比较复杂,不适合用 database 来做持久化,所以这里采用文件持久化方式。当然有些小伙伴会问干嘛不使用 shared_preferences 来存储,理论上应该没有太大的问题,但是个人建议相对复杂的数据使用文件存储会相对比较好点,一定要说个为什么,我也说不出来。
1 | /// 查看 `weather_bloc.dart` 文件 |
天气详情的刷新只有当个页面,所以 BLoC 的注册值需要在路由上注册即可,在 fluro 对应 handler 中加入注册
1 | Handler weatherHandler = Handler(handlerFunc: (_, params) { |
那么接下来就可以编写界面了,先实现最外层的背景图变化
1 | /// 查看 `weather_page.dart` 文件 |
页面最顶部是显示两个按钮,一个跳转城市选择,一个跳转设置页面,显示当前的城市
1 | class FollowedHeader extends StatelessWidget { |
接着是当前的天气详情部分
1 | class CurrentWeatherState extends StatelessWidget { |
接下来是一个天气预报的列表块,以为是一个列表,当然可以通过 Cloumn 来实现,但是前面有提到过一个列表「粘合剂」—- CustomScrollView,所以这里的整体连接最后会通过 CustomScrollView 来实现,那么你可以放心在最上层容器的 child 属性加上 CustomScrollView 了。接着来实现这块预报模块
1 | class WeatherForecast extends StatelessWidget { |
接着是空气质量报告,一个标题,下面由两个布局进行平分
1 | class AirQuality extends StatelessWidget { |
接下来是生活质量模块,看着也是个列表,但是后台返回的不是列表,而是根据不同字段获取不同质量指数,因为布局类似,所以可以对其进行封装再整体调用
1 | class LifeSuggestions extends StatelessWidget { |
所有的分模块都已经编写完成,剩下就是通过粘合剂进行组装了
1 | child: StreamBuilder( |
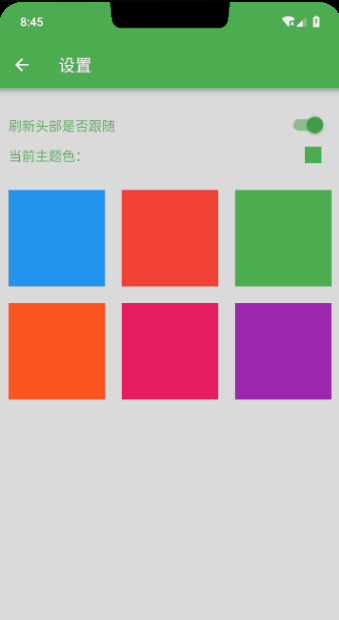
最后就剩下设置页的全局主题切换了
设置页全局主题切换
既然提到了数据的切换,那肯定就涉及 BLoC 毫无疑问了,还是照常编写管理类
1 | /// 查看 `setting_bloc.dart` 文件 |
因为是全局的切换,那么这个 BLoC 肯定需要在最顶层进行注册,这边就不贴代码了,同 ProvinceBloc 一致。接着编写界面,设置界面因为有 GridView 和其他部件,所以也需要用 CustomScrollView 作为粘合剂,当然,你也可以用 Wrap 代替 GridView 来实现网格,就不需要用 CustomScrollView,使用 Column 即可。
1 | class SettingsPage extends StatelessWidget { |
最终全局的主题切换也实现了。
编写完代码,需要打包啊,Android 下的打包大家肯定没问题,这里讲下 flutter 下如何打包 apk,ipa 因为没有 mac 所以你们懂的。
apk 文件打包
创建 jks 文件,如果已经存在可忽略这步从第二步开始。打开终端并输入
keytool -genkey -v -keystore [你的签名文件路径].jks -keyalg RSA -keysize 2048 -validity 10000 -alias key
然后输入密码以及一些基本信息就可以创建成功了
在项目的
android目录下创建一个key.properties文件,里面进行如下配置1
2
3
4storePassword=<password from previous step>
keyPassword=<password from previous step>
keyAlias=key
storeFile=<[你的签名文件路径].jks>在
android/app下的build.gradle中进行如下修改1
2
3
4
5
6
7
8
9
10
11
12
13
14
15
16
17
18
19
20
21
22
23
24
25
26
27apply from: "$flutterRoot/packages/flutter_tools/gradle/flutter.gradle"
// 增加如下部分代码
def keystorePropertiesFile = rootProject.file("key.properties")
def keystoreProperties = new Properties()
keystoreProperties.load(new FileInputStream(keystorePropertiesFile))
android {
// ...
defaultConfigs{
// ...
}
// 增加如下代码
signingConfigs {
release {
keyAlias keystoreProperties['keyAlias']
keyPassword keystoreProperties['keyPassword']
storeFile file(keystoreProperties['storeFile'])
storePassword keystoreProperties['storePassword']
}
}
buildTypes{
// ...
}
}再次打开终端运行
flutter build apk会自动生成一个 apk 文件,文件路径为[你的项目地址]\build\app\outputs\apk\release通过
flutter install就可以将正式包运行到手机上