1.前言
Android开发过程中,使用第三方的框架库已成家常便饭,使用第三方好处避免重复造轮子、降低成本、提升效率、降低风险等等,当遇到框架库不能满足现有业务、框架库设计缺陷或者漏洞、API使用深度不够时,如果停留只会使用层面,就会增加修改过程的难度,所以对于使用的框架库最好还是有个系统的认识;
本文带大家深入讲解
OkHttp;
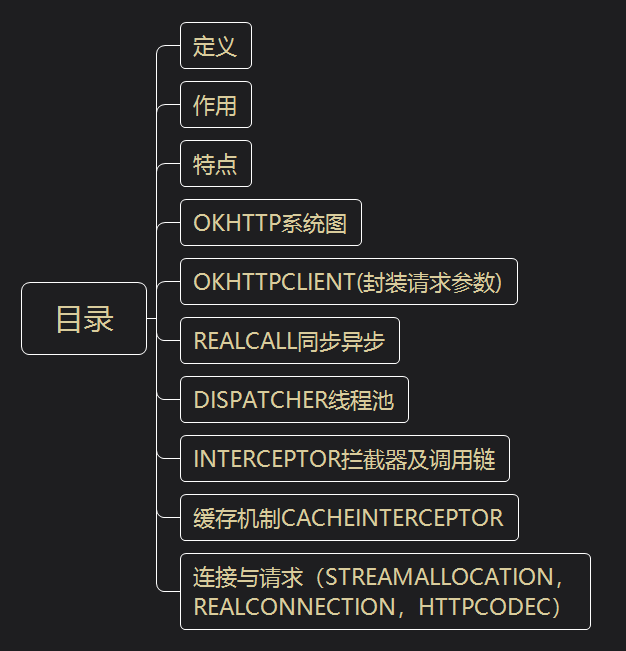
2.目录
3.定义
- 一款处理网络请求的开源项目,由Square公司贡献。
4.作用
- 通过建造者模式(Builder Pattern)方式,完成复杂的网络请求。
5.特点
- 1.同时支持HTTP1.1与支持HTTP2.0;
- 2.同时支持同步与异步请求;
- 3.同时具备HTTP与WebSocket功能;
- 4.拥有自动维护的socket连接池,减少握手次数;
- 5.拥有队列线程池,轻松写并发;
- 6.拥有Interceptors(拦截器),轻松处理请求与响应额外需求(例:请求失败重试、响应内容重定向等等);
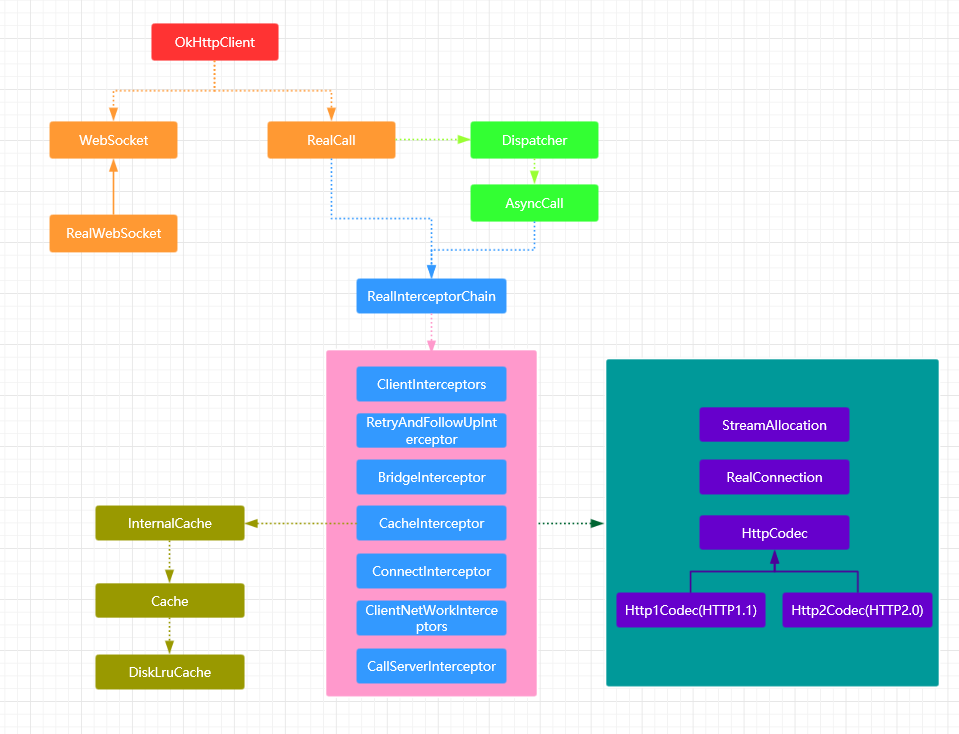
6.OkHttp系统图
7.OkHttpClient(封装请求参数)
OkHttpClient
通过建造者模式方式,完成请求参数配置。常用如下:connectTimeout :连接超时
- readTimeout:读取超时
- writeTimeout:写入超时
- pingInterval:websocket情况下连接心跳间隔
- interceptors:自定义拦截器
- networkInterceptors:自定义网络连接成功的拦截器
OkHttpClient除了完成请求参数的配置之外,还提供获取WebSocket、Call(Call实现类为RealCall,下文会介绍)相关类;
7.1 WebSocket
WebSocket是一种在单个TCP连接上进行全双工通信的协议,支持服务器想客户端的发送请求,由OkHttpClient创建,源码如下:
1 | /** |
注释1:WebSocket是一个接口,它的实现类RealWebSocket,该类完成WebSocket的连接、数据请求与接收功能。
7.2 Call初始化
1 | //OkHttpClient 初始化Call的函数 |
8.RealCall同步异步
RealCall是真正触发网络请求的类(实现Call接口,一次请求 = 一个RealCall实例),它提供了同步请求、异步请求;
8.1 同步请求
1 | public Response execute() throws IOException { |
注释1:将RealCall实例添加至Dispatcher中(下文会介绍Dispatcher)。
注释2:通过getResponseWithInterceptorChain()获取响应。
注释3:通过封装好的拦截器集合,获取第一个拦截器的任务。
注释4:触发第一个拦截器的任务,该任务就触发一下拦截器的任务,以此类推,原理(Android事件传递机制)如下图:
8.2 异步请求
1 | public void enqueue(Callback responseCallback) { |
注释1:把AsyncCall请求对象传递进Dispatcher线程池管理;
- AsyncCall 将请求业务放入到Runnable中。
1 | final class AsyncCall extends NamedRunnable { |
注释2:通过getResponseWithInterceptorChain()获取响应;
9.Dispatcher线程池
Dispatcher管理网络请求的线程池,其实就是把同步(RealCall)与异步(AsyncCall)的请求放进集合中统一管理,然后通过线程池执行AsyncCall的请求。
9.1 Dispatcher中同步(RealCall)
- RealCall在Dispatcher中,其实主要就是一个存储功能(即用一个集合把RealCall的请求进行存储)。
9.2 Dispatcher中异步(AsyncCall)
- AsyncCall在Dispatcher中,除了使用集合存储AsyncCall的请求,Dispatcher还初始化了一个线程池(ThreadPoolExecutor)处理AsyncCall的网络请求。
1 | public final class Dispatcher { |
注释1:获取自定义线程池;
注释2:判断正在执行的异步请求数量与请求集合中相同host的数量是否满足,如果满足就添加到执行中的集合中,并添加至线程池中执行请求;如果不满足就添加至待执行请求的集合中,等待执行中的请求完成之后,再执行相同host数量判断满足才添加至线程池中执行请求;
注释3:将请求对象AsyncCall添加进请求执行的集合中;
注释4:将请求对象AsyncCall添加进线程池中执行;
注释5:当不满足执行条件时(注释2),把请求对象添加至待执行的集合中;
注释6:每当一个请求执行完毕时,就会调用finished()去掉对应集合中的存储对象,并在次判断待执行的集合中是否有满足条件的请求,若满足就添加至执行的集合与线程池中执行,若不满足继续等待下一个请求完成再次判断。
注释7:判断待执行的集合中是否满足可执行的对象。
10.Interceptor拦截器及调用链
Interceptor拦截器,供使用者可在请求过程或者响应过程中自定义额外的业务处理(例如:最常见的请求失败重试、响应数据的重定向等等)。- OkHttp3中,除了可自定义额外的拦截器之外,它内部也存储一些固定的拦截器处理其内部业务逻辑,下面就会介绍它们(RetryAndFollowUpInterceptor、BridgeInterceptor、CacheInterceptor、ConnectInterceptor、CallServerInterceptor);
10.1 RetryAndFollowUpInterceptor
- 定义:重定向拦截器;
- 作用:在无法请求服务器或者请求失败时,服务器会告诉客户端可以处理请求的url,然后重定向拦截器承当重新请求新url的作用(服务器返回3XX错误码为重定向,可以通过响应头的Location获取新请求的url);
10.2 BridgeInterceptor
- 定义:桥拦截器;
- 作用:封装请求头(Content-Type、Connection、Cookie…)与响应头(“Content-Encoding…)的信息。
10.3 CacheInterceptor
- 定义:缓存拦截器;
- 作用:为网络请求提供缓存功能,加快相同请求的访问速度,减少资源损耗。
10.4 ConnectInterceptor
- 定义:连接拦截器;
- 作用:与服务器建立通讯连接。
10.5 CallServerInterceptor
- 定义:请求服务器拦截器;
- 作用:与服务器进行数据通讯(包含请求头、请求内容)。
10.6 调用链
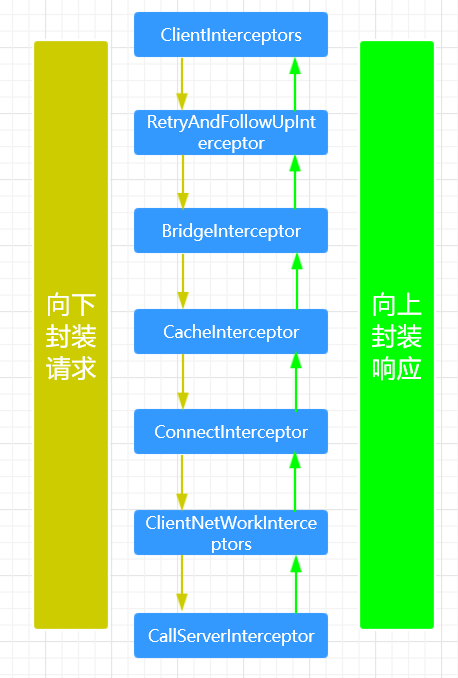
上文也提到任务链结构图(责任链模式):
其实它的原理类似于(Android 事件传递机制),向下传递请求,向上反馈响应,在调用RealInterceptorChain的proceed()时,创建下一个拦截器的任务,并通过拦截器中intercept()把任务传递至当前拦截器进行关联,然后以此类推,相关代码如下:
1 | public final class RealInterceptorChain implements Interceptor.Chain { |
11.缓存机制CacheInterceptor
- 看看缓存机制CacheInterceptor的实现原理:
1 | public final class CacheInterceptor implements Interceptor { |
12.连接与请求(StreamAllocation,RealConnection,HttpCodec)
- OkHttp3把网络连接、请求数据通讯过程封装StreamAllocation,RealConnection,HttpCodec中;
- StreamAllocation:负责初始化RealConnection、HttpCodec,并将前2者与RealCall进行关联;
1.StreamAllocation初始化(在RetryAndFollowUpInterceptor进行实例化)
1 | public final class RetryAndFollowUpInterceptor implements Interceptor { |
2.RealConnection与HttpCodec初始化(RealConnection在ConnectInterceptor中通过StreamAllocation的newStream()初始化,而HttpCodec在RealConnection中被初始化)
1 | public final class ConnectInterceptor implements Interceptor { |
- RealConnection:真正的负责完成网络连接;
1 | public final class RealConnection extends Http2Connection.Listener implements Connection { |
HttpCodec:
负责完成发送请求头与数据内容(使用okio完成数据的写入与读出);
- Http1Codec:处理HTTP1.1协议的数据传递。
- Http2Codec:处理HTTP2.0协议的数据传递。
13.实例
- 编写一个简单GET请求:
1 | public void get(){ |
14.总结
- 到此,
Android OkHttp3就讲解完毕。