Android-仪表盘控件仿芝麻信用

前言

由于项目需要使用到仪表盘图表,所以就本着一贯的操作流程就来github上面找,结果发现很多图表或者不是我需要的或者扩展性不强,所以就自己动手写了一个扩展性较强的,希望能帮助到有需要的人。(不过本人能力有限,有不足的地方还请见谅)
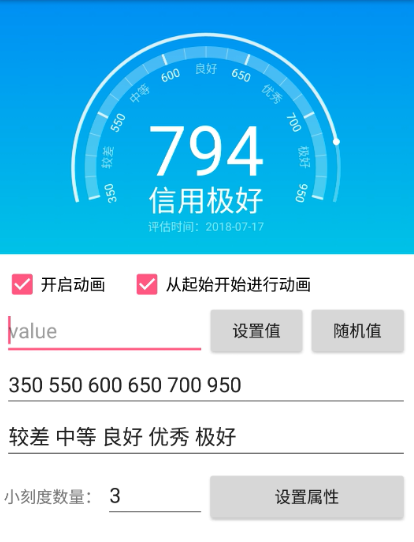
效果

来源:Github传送门

先定个小目标

由于每个公司的UI肯定都有不同的想法,设计出来的效果图也千奇百怪。所以我一开始的想法是能写一个基类的仪表盘图表,不需要懂得太多的自定义View知识也能做出UI所需要的效果。

我就想尝试着能不能自己写一个,万一能帮助到其他人呢。(梦想还是要有的)

所以我就抽取了一个BaseDashboardView类,并实现了三个Style的仪表盘图表。而这三个仪表盘除去一些画笔的初始化和参数的设置,绘制的代码都在70行内。下面就来看一下如何定义一个自己的仪表盘图表吧。

然后去做吧

创建一个View然后去继承 BaseDashboardView 这时需要实现以下方法:

1
2
3
4
5
6
7
8
9
protected abstract void initView();

protected abstract void initArcRect(float left, float top, float right, float bottom);

protected abstract void drawArc(Canvas canvas, float arcStartAngle, float arcSweepAngle);

protected abstract void drawProgressArc(Canvas canvas, float arcStartAngle, float progressSweepAngle);

protected abstract void drawText(Canvas canvas, int value, String valueLevel, String currentTime);

然后让我们来看看每个方法都是什么用的。

initView() 就是初始化设置,如创建画笔等。

initArcRect(float left, float top, float right, float bottom) 在我们绘制圆弧的时候可以传入Rect对象来确定圆弧的绘制范围,需要这里就是给我们初始化圆弧的区域的。 如:mRectArc = new RectF(left, top, right, bottom);

drawArc(Canvas canvas, float arcStartAngle, float arcSweepAngle)这是就是开始正式的绘制背景圆弧了,arcStartAngle表示圆弧的起始角度,arcSweepAngle表示圆环一共多少度。我们通过刚才的Rect就可以绘制出一个圆弧如:canvas.drawArc(mRectOuterArc, arcStartAngle, arcSweepAngle, false, mPaintArc);但是要主要画笔的样式要设置为Paint.Style.STROKE

drawProgressArc(Canvas canvas, float arcStartAngle, float progressSweepAngle)而这里是绘制进度圆弧的地方,progressSweepAngle进度的幅度已经在BaseDashboardView中计算好,只需要通过drawArc中的一样绘制个圆弧就行。

drawText(Canvas canvas, int value, String valueLevel, String currentTime)在这里可以把文字绘制到你想要他出现的地方就OK拉。数据已经在BaseDashboardView中处理过,直接绘制就可以。

由于很多逻辑的计算和动画都是在BaseDashboardView中去实现,所以我们只需要实现这几个方法,然后实现一些绘制的逻辑就可以咯。如果在绘制方面有什么问题的可以查看一下3个样式的DashboardView,如果是对底层的计算有兴趣的可以看一下BaseDashboardView

接下来就去扩展

这里主要说一个方法setCalibration(int[] calibrationNumberText, String[] calibrationBetweenText,int largeCalibrationBetweenNumber)

然后主要说一下calibrationNumberTextcalibrationBetweenText参数,他们的初始默认值是 int[]{350, 550, 600, 650, 700, 950}String[]{"较差", "中等", "良好", "优秀", "极好"} 那这样其实组成了一个区间 350 较差 550 中等 600 良好 650 优秀 700 极好 950 他的意思为350-550的为较差,其他依次类推,但是每个区间的大小是不一样的,较差的区间为550-350=200,而中等区间为650-550=50。但是每个区间在图表上显示的区域大小确实相同的。那么在计算进度幅度的时候需要区别计算。

而我的实现方式是首先判断当前value在第几个区间中,如当前value=575。那么通过循环的方式可以知道当前value处在550和600之间。然后通过 (575 - 550) / (600 - 550)公式计算出当前值在这个区间内占的百分比。然后通过每个区间的角度算出当前进度条的幅度。

而除了刻度的扩展其实还有很多其他的可配置项,可以通过github进行查看。

公共方法介绍

1
2
3
4
5
6
7
8
9
10
11
12
13
14
15
16
17
18
19
20
21
22
23
24
25
26
27
28
29
30
31
32
33
34
35
36
37
//设置当前数值 value:数值 isAnim:是否开启东湖 reset:是否从头开始进行动画
setValue(int value, boolean isAnim, boolean reset)

//设置动画时长 (默认为2.5秒)
setProgressAnimTime(long time)

//设置圆弧角度
//arcStartAngle:起始角度 (默认值: 165)
//arcSweepAngle:圆弧度数 (默认值: 210)
setArcAngle(float arcStartAngle,float arcSweepAngle){

//设置刻度属性
//calibrationNumberText 每个大刻度对应的数值 (默认值: int[]{350, 550, 600, 650, 700, 950})
//calibrationBetweenText 每个大刻度中间的文字 (默认值: String[]{"较差", "中等", "良好", "优秀", "极好"})
//largeCalibrationBetweenNumber 两个大刻度中间有多少个小刻度 (默认值: 3)
setCalibration(int[] calibrationNumberText, String[] calibrationBetweenText,int largeCalibrationBetweenNumber)

//设置日期格式化的格式 (默认值: yyyy-MM-dd)
setDatePattern(String pattern)

//设置时间的显示格式 格式(如: 评估时间:{date}) {date}为占位符
setDateStrPattern(String pattern)

//设置数值等级的模板 格式(如: 信用{level}) {level}为占位符
setValueLevelPattern(String pattern)

//设置数值的画笔属性 (默认值: 60sp white)
setValuePaint(float spSize, @ColorInt int color)

//设置数值等级的画笔属性 (默认值: 25sp white)
setValueLevelPaint(float spSize, @ColorInt int color)

//设置日期对应的画笔属性 (默认值: 10sp white)
setDatePaint(float spSize, @ColorInt int color)

//设置中间文字中间的间距 (默认值: 7dp)
setTextSpacing(int spacingDp)

Style 1

1
2
3
4
5
6
7
8
9
10
11
12
13
14
15
16
17
18
19
20
21
22
23
24
25
26
//设置圆环之间的距离 (默认值: 15dp)
setArcSpacing(float dpSize)

//设置外环的画笔属性 (默认值: 3dp Color.argb(80, 255, 255, 255))
setOuterArcPaint(float dpSize, @ColorInt int color)

//设置内环的画笔属性(默认值: 10dp Color.argb(80, 255, 255, 255))
setInnerArcPaint(float dpSize, @ColorInt int color)

//设置进度条的颜色 (默认值: Color.argb(200, 255, 255, 255))
setProgressArcColor(@ColorInt int color)

//设置进度条的点的画笔属性 (默认值: 3dp white)
setProgressPointPaint(float dpRadiusSize,@ColorInt int color)

//设置大刻度的画笔属性 (默认值: 2dp Color.argb(200, 255, 255, 255))
setLargeCalibrationPaint(float dpSize, @ColorInt int color)

//设置小刻度的画笔属性 (默认值: 0.5dp Color.argb(100, 255, 255, 255))
setSmallCalibrationPaint(float dpSize, @ColorInt int color)

//设置刻度文字的画笔属性 (默认值: 10sp white)
setCalibrationTextPaint(float spSize, @ColorInt int color)

//设置大刻度中间的数值等级的画笔属性 (默认值: 10sp white)
setCalibrationBetweenTextPaint(float spSize, @ColorInt int color)

Style 2

1
2
3
4
5
6
7
8
//设置圆环颜色 (默认值: Color.argb(120, 255, 255, 255))
setArcColor(@ColorInt int color)

//设置进度圆环的颜色 (默认值: Color.argb(200, 255, 255, 255))
setProgressColor(@ColorInt int color)

//设置圆环的刻度大小 (默认值: 2.5dp)
setArcCalibrationSize(int dpSize)

Style 3

1
2
3
4
5
6
7
8
9
10
11
12
13
14
15
16
17
18
19
20
21
22
23
//设置圆环之间的距离 (默认值: 10dp)
setArcSpacing(float dpSize)

//设置外环的画笔属性 (默认值: 1.5dp Color.argb(80, 255, 255, 255))
setOuterArcPaint(float dpSize, @ColorInt int color)

//设置外环的进度颜色 (默认值: Color.argb(200, 255, 255, 255))
setProgressOuterArcColor(@ColorInt int color)

//设置内环的画笔属性 (默认值: 1.5dp Color.argb(50, 255, 255, 255))
setInnerArcPaint(float dpSize, @ColorInt int color)

//设置内环的进度颜色 (默认值: Color.argb(170, 255, 255, 255))
setProgressInnerArcPaint(@ColorInt int color)

//设置内环实线和虚线状态 (默认值: float[] { 10, 10 })
setInnerArcPathEffect(float[] intervals)

//设置进度点的画笔属性 (默认值: 3dp white)
setProgressPointPaint(float dpRadiusSize,@ColorInt int color)

//设置指示器颜色 (默认值: Color.argb(200, 255, 255, 255))
setIndicatorPaint(@ColorInt int color)
坚持原创技术分享,您的支持将鼓励我继续创作!