Flutter入门指南(十二)之数据持久化

上节讲了状态管理,但是当 App 重启后,数据就都丢失了,这样就比较尴尬了,什么都要重来,所以这节我们来讲下数据持久化。数据持久化主要有如下方式

  • 文件读写
  • shared_preferences 存储
  • 数据库存储

持久化的实现都需要通过三方插件来实现,接着会慢慢介绍三种实现方式

文件读写/ IO 操作

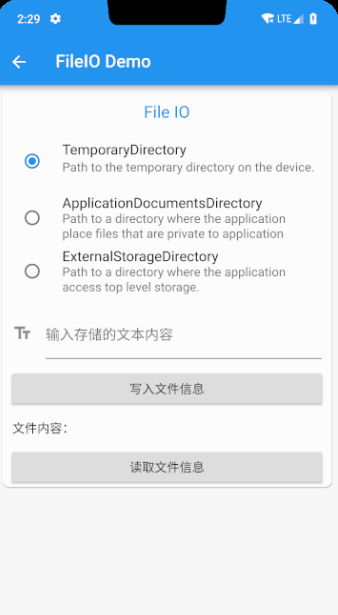
文件读写需要 path_provider 插件,写这篇文章的时候,最新版本是 0.5.0+1,小伙伴们可以根据官网最新的版本进行替换,导入后我们就可以来看下如何实现文件的读写了。path_provider 的源码比较简单,这边就不单独拎出来说了,可以自行查看。path_provider 用于获取手机的存储文件位置,一共有三个方法

  • getTemporaryDirectory 临时目录,在 Android 中对应的方法为 getCacheDir,而在 iOS 中对应为 NSCachesDirectory,可以通过系统检测并清除
  • getApplicationDocumentsDirectory 缓存目录,在 Android 中对应为 AppData 文件夹,在 iOS 中对应为 NSDocumentsDirectory,只有当 App 被删除才能被删除
  • getExternalStorageDirectory 外部存储目录,只有在 Android 中有效,在 iOS 调用会抛出 UnsupportedError 异常,不过 Android 在写入前记得先申请权限哟,否则也是不行滴。

读写文件操作需要通过 DartIO 操作完成,这边小伙伴们可以自己看文档 File class,接着我们就直接通过例子来看文件实现数据持久化。先看下效果吧,最终重启 App 后,数据也能正常读取显示,说明数据被保存下来了

看下实现的代码,因为会涉及到多种方式,所以这边我把视图抽取出来实现

1
2
3
4
5
6
7
8
9
10
11
12
13
14
15
16
17
18
19
20
21
22
23
24
25
26
27
28
29
30
31
32
33
34
35
36
37
38
39
40
41
42
43
44
45
46
47
48
49
50
51
52
53
54
55
56
57
58
59
60
61
62
63
64
65
66
67
68
69
Widget _fileIoPart() {
return Card(
margin: const EdgeInsets.all(8.0),
shape: RoundedRectangleBorder(borderRadius: BorderRadius.all(Radius.circular(8.0))),
child: Column(children: <Widget>[
Padding(
padding: const EdgeInsets.all(12.0),
child: Text('File IO', style: TextStyle(fontSize: 20.0, color: Theme.of(context).primaryColor)),
),
// RadioList 是单选按钮部件,通过选择不同的情况,创建不同目录的文件
RadioListTile(
value: _radioText[0],
title: Text(_radioText[0]),
subtitle: Text(_radioDescriptions[0]),
groupValue: _currentValue,
onChanged: ((value) {
setState(() => _currentValue = value);
})),
RadioListTile(
value: _radioText[1],
title: Text(_radioText[1]),
subtitle: Text(_radioDescriptions[1]),
groupValue: _currentValue,
onChanged: ((value) {
setState(() => _currentValue = value);
})),
RadioListTile(
value: _radioText[2],
title: Text(_radioText[2]),
subtitle: Text(_radioDescriptions[2]),
groupValue: _currentValue,
onChanged: ((value) {
setState(() => _currentValue = value);
})),
Padding(
padding: const EdgeInsets.all(12.0),
// 用于写入文本信息
child: TextField(
controller: _editController,
decoration: InputDecoration(labelText: '输入存储的文本内容', icon: Icon(Icons.text_fields)),
),
),
Container(
margin: const EdgeInsets.symmetric(horizontal: 12.0),
width: MediaQuery.of(context).size.width,
child: RaisedButton(
onPressed: _writeTextIntoFile,
child: Text('写入文件信息'),
),
),
Padding(
padding: const EdgeInsets.all(12.0),
child: Row(
crossAxisAlignment: CrossAxisAlignment.start,
mainAxisAlignment: MainAxisAlignment.center,
children: <Widget>[Text('文件内容:'), Expanded(child: Text(_fileContent, softWrap: true))],
),
),
Container(
margin: const EdgeInsets.symmetric(horizontal: 12.0),
width: MediaQuery.of(context).size.width,
child: RaisedButton(
onPressed: _readTextFromFile,
child: Text('读取文件信息'),
),
),
]),
);
}

关键的部分在于 _writeTextIntoFile_readTextFromFile 两个方法的实现。看下实现的代码

1
2
3
4
5
6
7
8
9
10
11
12
13
14
15
16
17
18
19
20
21
22
23
24
25
26
27
28
29
30
31
32
33
34
35
36
37
38
39
40
41
// 如果写入外部内存需要读写权限,这边使用了第三方插件 `permission_handler`
void _writeTextIntoFile() async {
if (_currentValue == _radioText[2]) {
PermissionStatus status = await PermissionHandler().checkPermissionStatus(PermissionGroup.storage);
if (status == PermissionStatus.granted) // 如果是写入外部存储,则检测权限状态,同意则写入
_writeContent();
else if (status == PermissionStatus.disabled) // 拒绝了提示手动打开
Fluttertoast.showToast(msg: '未打开相关权限');
else // 未同意则主动申请权限
PermissionHandler().requestPermissions([PermissionGroup.storage]);
} else // 不是写入外部存储直接写入文件
_writeContent();
}

// 文本写入文件
void _writeContent() async {
// 写入文本操作
var text = _editController.value.text; // 获取文本框的内容
File file = File(await _getFilePath()); // 获取相应的文件

if (text == null || text.isEmpty) {
Fluttertoast.showToast(msg: '请输入内容'); // 内容为空,则不写入并提醒
} else {
// 内容不空,则判断是否已经存在,存在先删除,重新创建后写入信息
if (await file.exists()) file.deleteSync();
file.createSync(); // createSync 是一个同步的创建过程
file.writeAsStringSync(text); // writeAsStringSync 是同步写入的过程
_editController.clear(); // 写入文件后清空输入框信息
}
}

// 读取文本操作
void _readTextFromFile() async {
File file = File(await _getFilePath());
if (await file.exists()) {
setState(() => _fileContent = file.readAsStringSync()); // 文件存在则直接显示文本信息
} else {
setState(() => _fileContent = ''); // 文件不存在则清空显示文本信息,并提示
Fluttertoast.showToast(msg: '文件还未创建,请先通过写入信息来创建文件');
}
}

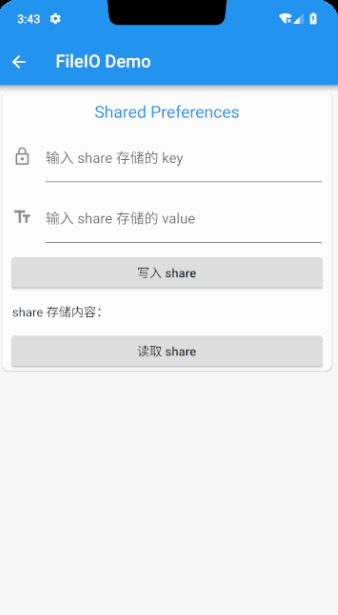
因为外部存储的文件需要涉及到权限问题,而且 iOS 也不支持,所以如果需要使用文件来持久化数据的话,尽量使用另外两种。因为在例子中,我们保存的数据相对比较简单,所以这边就不得不说另外一种更方便的持久化方式了 shared_preferences

SharedPreferences

写 Android 的小伙伴对这个应该不陌生了,但是 Flutter 并没有自带的 shared_preferences 功能,需要第三方插件来实现,引入 shared_preferences 插件,写文章的时候最新版本是 ^0.5.1+2,还是先看下最后的效果

代码的实现相对比较简单

1
2
3
4
5
6
7
8
9
10
11
12
13
14
15
16
17
18
19
20
21
22
23
24
25
26
27
28
29
30
31
32
33
34
35
36
37
38
39
40
41
42
43
44
45
46
47
48
49
50
51
52
53
54
Widget _sharedPart() {
return Card(
margin: const EdgeInsets.all(8.0),
shape: RoundedRectangleBorder(borderRadius: BorderRadius.all(Radius.circular(8.0))),
child: Column(
children: <Widget>[
Padding(
padding: const EdgeInsets.all(12.0),
child:
Text('Shared Preferences', style: TextStyle(fontSize: 20.0, color: Theme.of(context).primaryColor)),
),
Padding(
padding: const EdgeInsets.fromLTRB(12.0, 0, 12.0, 12.0),
// 用于设置 key 信息
child: TextField(
controller: _shareKeyController,
decoration: InputDecoration(labelText: '输入 share 存储的 key', icon: Icon(Icons.lock_outline)),
),
),
Padding(
padding: const EdgeInsets.fromLTRB(12.0, 0, 12.0, 12.0),
// 用于写入文本信息
child: TextField(
controller: _shareValueController,
decoration: InputDecoration(labelText: '输入 share 存储的 value', icon: Icon(Icons.text_fields)),
),
),
Container(
margin: const EdgeInsets.symmetric(horizontal: 12.0),
width: MediaQuery.of(context).size.width,
child: RaisedButton(
onPressed: _writeIntoShare,
child: Text('写入 share'),
),
),
Padding(
padding: const EdgeInsets.all(12.0),
child: Row(
crossAxisAlignment: CrossAxisAlignment.start,
mainAxisAlignment: MainAxisAlignment.center,
children: <Widget>[Text('share 存储内容:'), Expanded(child: Text(_shareContent, softWrap: true))],
),
),
Container(
margin: const EdgeInsets.symmetric(horizontal: 12.0),
width: MediaQuery.of(context).size.width,
child: RaisedButton(
onPressed: _readFromShare,
child: Text('读取 share'),
),
),
],
));
}

实现的关键部分就是方法 _writeIntoShare_readFromShare

1
2
3
4
5
6
7
8
9
10
11
12
13
14
15
16
17
18
19
20
21
22
23
24
25
26
27
28
29
30
31
32
33
34
void _writeIntoShare() async {
var shareKey = _shareKeyController.value.text;
var shareContent = _shareValueController.value.text;

if (shareKey == null || shareKey.isEmpty) {
Fluttertoast.showToast(msg: '请输入 key');
} else if (shareContent == null || shareContent.isEmpty) {
Fluttertoast.showToast(msg: '请输入保存的内容');
} else {
// 通过 `getInstance` 获取 `shared_preferences` 单例
var sp = await SharedPreferences.getInstance();
// sp 能保存的数据类型包括 `int`, `String`, `bool`, `double`, `StringList`
sp.setString(shareKey, shareContent);
}
}

void _readFromShare() async {
var shareKey = _shareKeyController.value.text;

if (shareKey == null || shareKey.isEmpty) {
Fluttertoast.showToast(msg: '请输入 key');
} else {
var sp = await SharedPreferences.getInstance();
// 数据读取的类型同写入类型,如果传入的 key 不存在则返回 null
var value = sp.getString(shareKey);

if (value == null) {
Fluttertoast.showToast(msg: '未找到该 key');
setState(() => _shareContent = '');
} else {
setState(() => _shareContent = value);
}
}
}

这两种数据持久化的方式主要用于存储相对简单,关系不复杂的数据,如果涉及到大量的,且字段之间有关系的情况就需要通过数据库来实现了,Android 和 iOS 都自带 sqlite 数据库。

以上代码查看 data_persistence_main.dart 文件

Sqflite

Flutter 实现数据库存储需要通过插件 sqflite 来实现,写文章的时候最新的版本是 sqflite 1.1.3,但是该版本需要 flutter 1.2 以上才行,所以我选择的是 sqflite 1.1.0,小伙伴可以根据自己的 flutter 版本选择相应的 sqflite 版本

sqflite 的基本操作语句,在文档中已经写得非常明白了,所以就不搬运了,这边直接讲下对于数据库的一些封装处理吧,因为打开数据库是一个很消耗资源的一个过程,所以呢,推荐实现单例会比较好。例如我们要实现一个 student 存储表

1
2
3
4
5
6
7
8
9
10
11
12
13
14
15
16
17
18
19
20
21
22
23
24
25
26
27
28
29
30
31
32
33
34
35
36
37
class DatabaseUtils {
final String _tableStudent = 'student';

static Database _database; // 创建单例,防止重复打开消耗内存

static DatabaseUtils _instance;

static DatabaseUtils get instance => _instance;

DatabaseUtils._internal() {
getDatabasesPath().then((path) async {
_database = await openDatabase(join(path, 'demo.db'), version: 2, onCreate: (db, version) {
// 创建数据库的时候在这边调用
db.execute('create table $_tableStudent '
'id integer primary key autoincrement,'
'name text not null,'
'age integer not null default 0,'
'gender integer not null default 0');

// 更新升级增加的字段
db.execute('alter table $_tableStudent add column birthday text');
}, onUpgrade: (db, oldVersion, newVersion) {
// 更新升级数据库的时候在这操作
if (oldVersion == 1) db.execute('alter table $_tableStudent add column birthday text');
}, onOpen: (db) {
// 打开数据库时候的回调
print('${db.path}');
});
});
}

factory DatabaseUtils() {
// 如果当前的单例已经存在,则不再创建,否则重新创建,factory 关键词看第一章
if (_instance == null) _instance = DatabaseUtils._internal();
return _instance;
}
}

那么对数据库的操作就完全考验你的 SQL 的掌握程度了,但是千万记住,sqlite 中的类型只有,整型 integer ,字符类型 text,浮点类型 real,二进制 blob。数据库的具体例子会等到最后的实际项目中展示,原谅我不懂如何展示一个界面给你操作,实现数据库的各种功能。

该部分代码查看 db_util.dart 文件,里面有一些基本的操作写法,小伙伴可自行查看。

坚持原创技术分享,您的支持将鼓励我继续创作!