概述
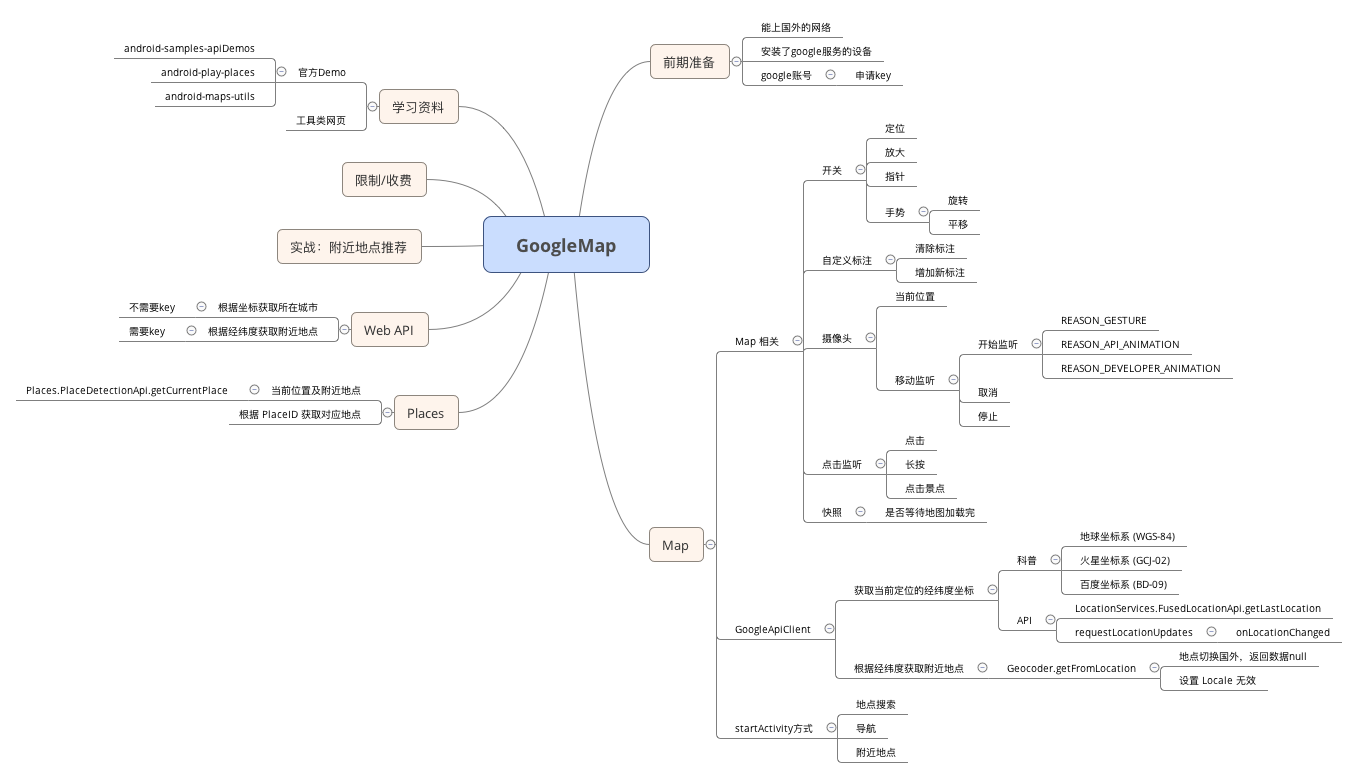
通过本文,你可以知道如何使用 GoogleMap 相关 API、定位当前位置、获取当前所在城市、获取当前位置附近的地点、导航、地点搜索等内容。大致内容,可以查看如下思维导图。
特别注意:
demo 使用的 GoogleMap key 对应我自己电脑的 keystore,如果重新编译项目,生成的apk使用的是你的电脑的 keystore,和我的 keystore 是不一样的,所以要正常运行,
- 直接下载我编译好的 apk;
- 用我的项目包名,和你自己的 keystore 的 SHA-1 去申请新的 GoogleMap key。(方法在下面,往下看哈)
前期准备
网络
因为国内众所周知的网络问题,谷歌地图的页面加载和 API 的使用会出现无效的情况,如果你要使用或调试,首先要确保是可以科学上网的。
设备
Android 设备,必须安装了 Google 服务。
谷歌账号
作为用户,不需要拥有或者登录你的 Google 账号。网络和 Google 服务正常即可。
作为开发者,必须拥有一个 Google 账号。要知道,谷歌地图是不开源的,要使用他的 API ,必须用你的包名,和编译 Android app 的 keystore 的 SHA-1,去申请App 对应的 Google Map Key。获取 Key 的教程官网讲得很详细,请看这里
Google API Console 设置完成后,如下图所示:
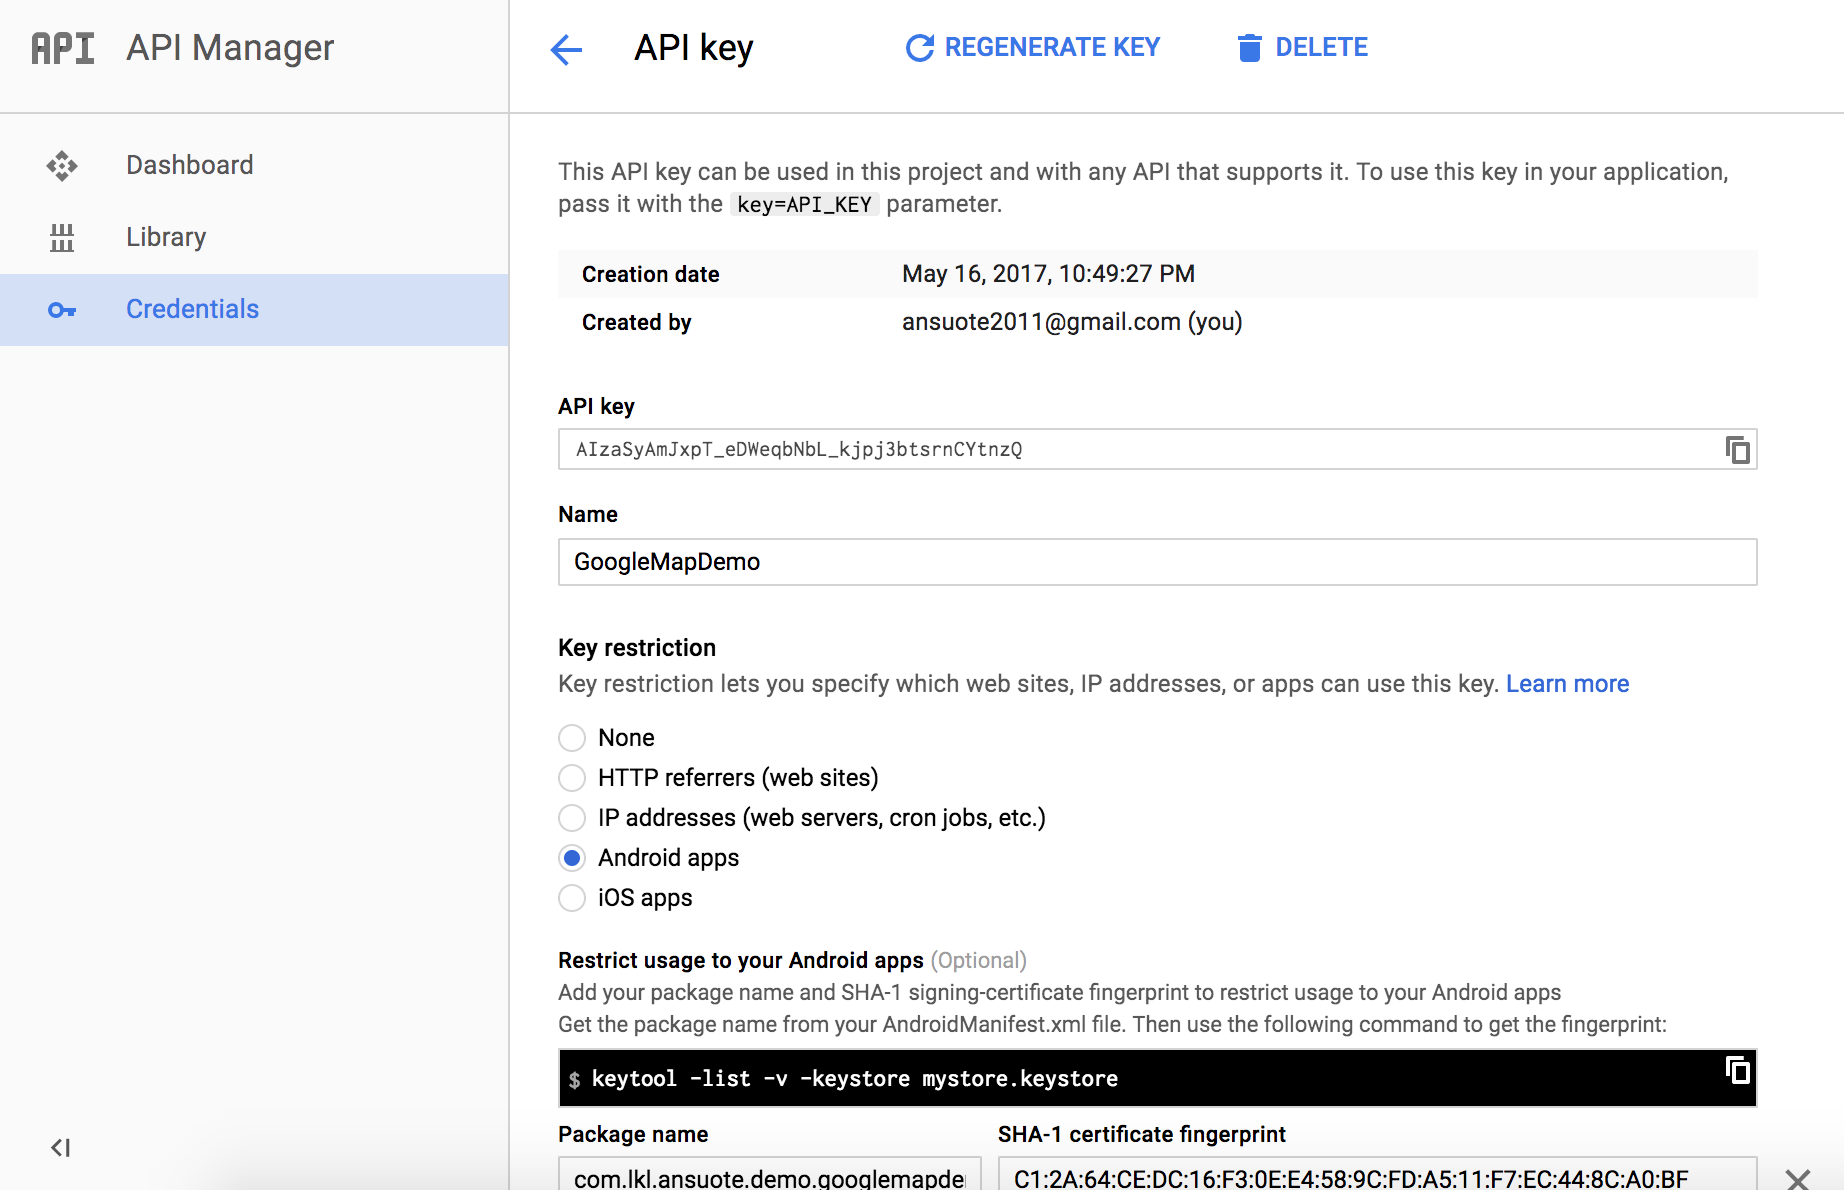
设置好后,还要确保已经 Enable了对应的API,不然会出现数据访问不到的情况。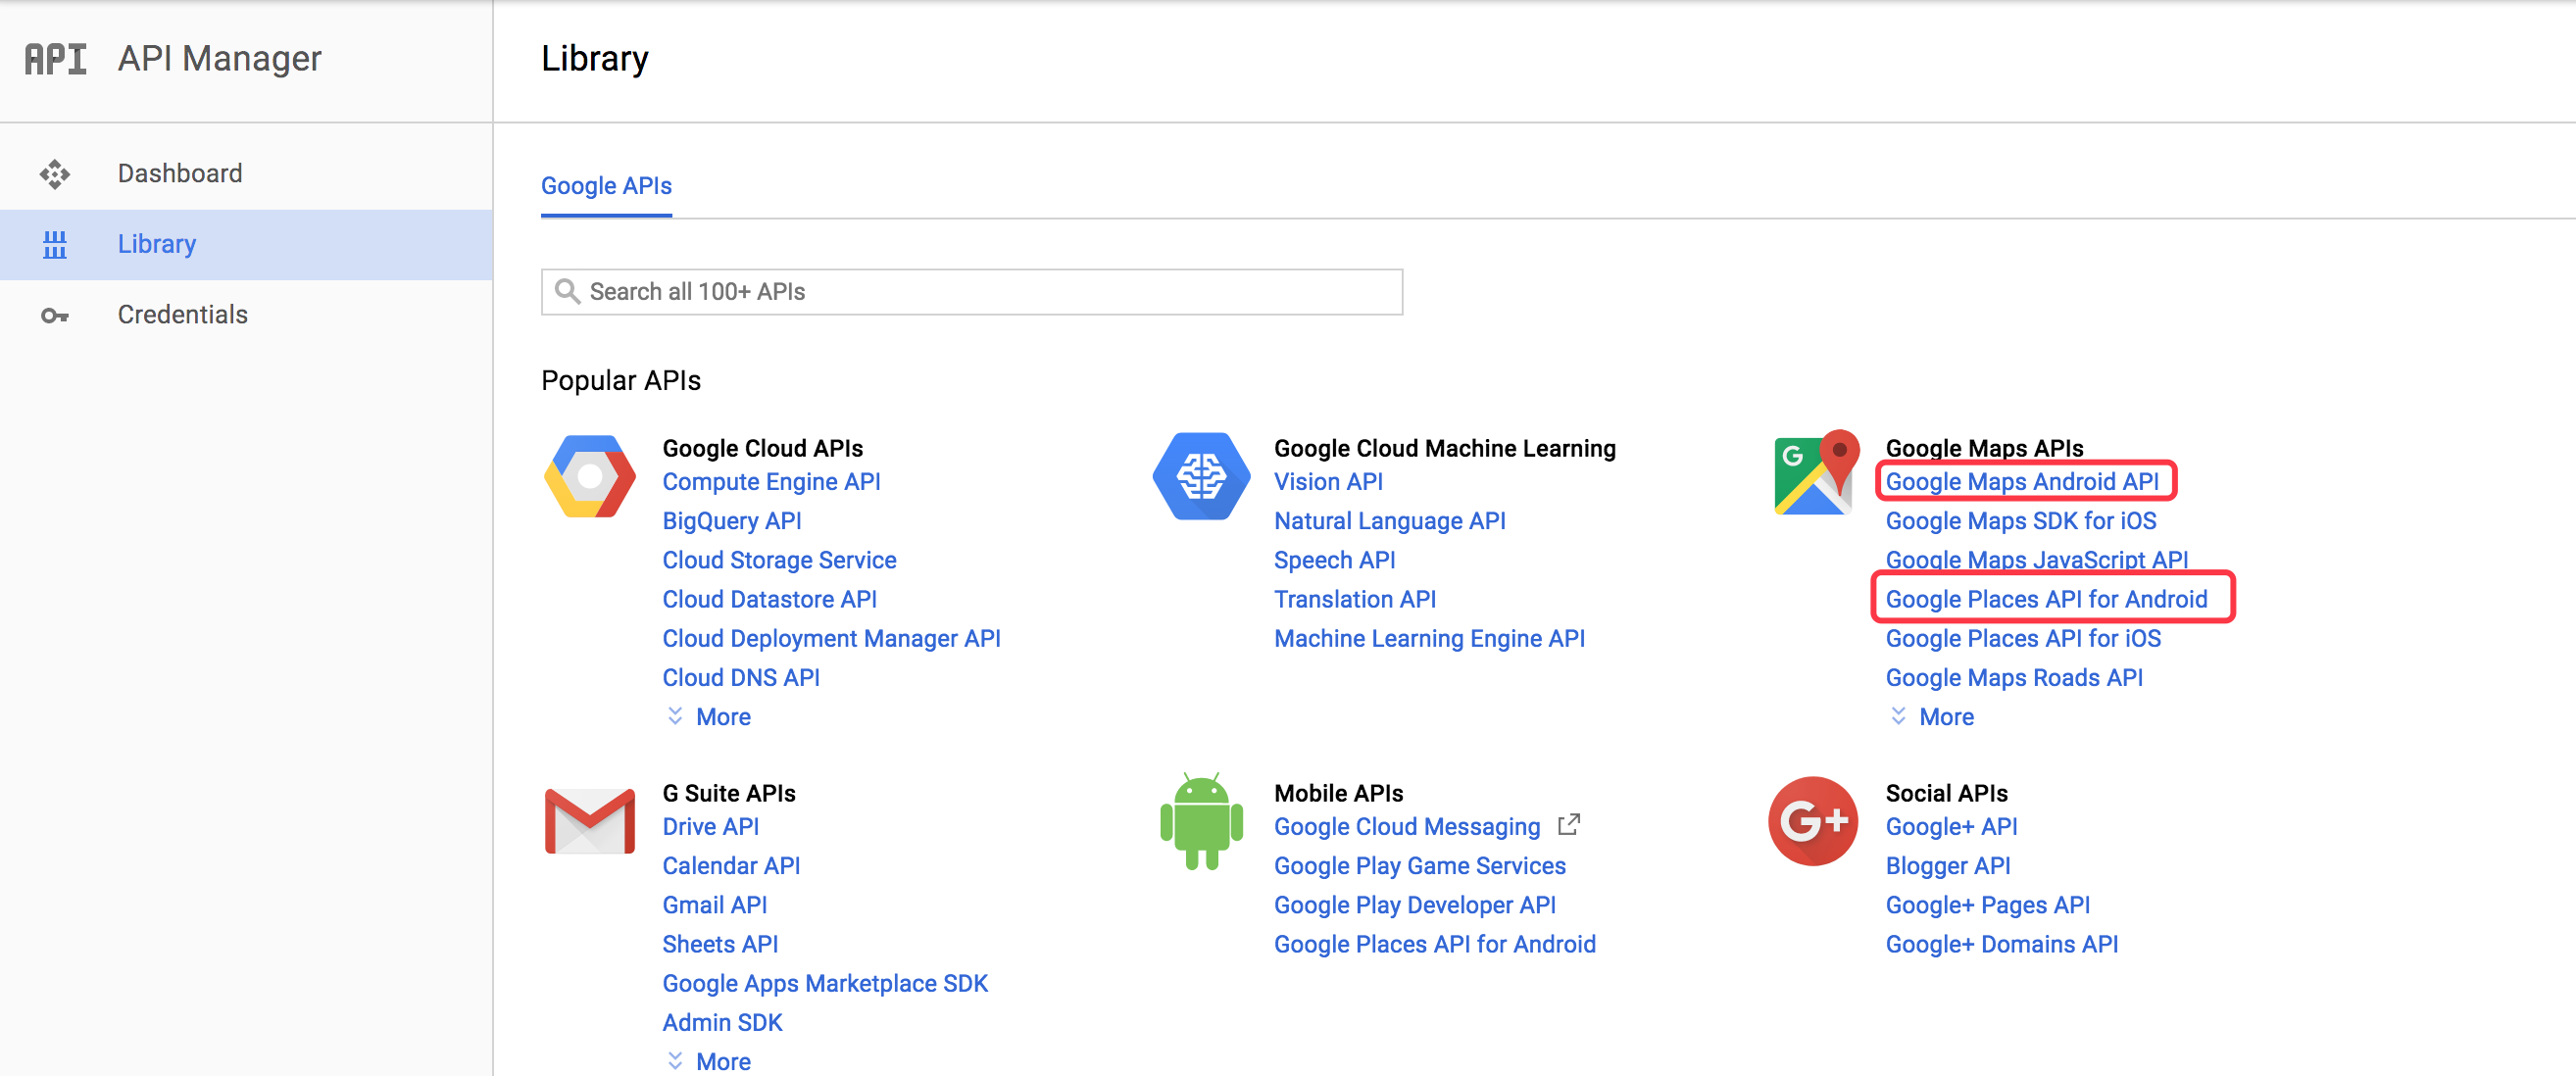
把这个 API key 填入 AndroidManifest.xml :
1 | <meta-data |
Map 相关
前提
初始化 Google Map
布局
在你的布局文件里面,只需要如下方式声明一个 Fragment,这个 Fragment 是可以放在 LinearLayout 或 RelativeLayout 下面的。
1 | <fragment |
Activity
在 onCreate 的时候,进行初始化操作。
1 | private GoogleMap mMap; |
确保 GoogleMap 实例化
在使用 GoogleMap 相关接口前,必须确保 GoogleMap 已经实例化,即已经在 onMapReady回调中获取了 GoogleMap实例。
开关类
定位按钮
定位功能必须获取用户的位置权限,判断是非获取了用户权限,没有获取则手动请求权限。
1 | /** |
要让地图上显示开关按钮,只需要设置mMap.setMyLocationEnabled(true);
点击此按钮,地图的摄像头就会开始移动,定位到当前设备所在位置,如果要获取点击此按钮的回调,可以设置监听器 mMap.setOnMyLocationButtonClickListener
放大/缩小按钮
地图的放大缩小,就以摄像头焦点(地图中心)进行缩放。要出现这个开关,只需要
1 | UiSettings uiSettings = mMap.getUiSettings(); |
指南针按钮
1 | UiSettings uiSettings = mMap.getUiSettings(); |
手势
旋转
1
2UiSettings uiSettings = mMap.getUiSettings();
uiSettings.setRotateGesturesEnabled(mRotateGesturesEnabled);平移
1
2UiSettings uiSettings = mMap.getUiSettings();
uiSettings.setScrollGesturesEnabled(mScrollGesturesEnabled);
自定义标注
清除标注
1 | mMap.clear(); |
新增标注
增加一个标注,只需要把当前的经纬度,图标,标题等信息传入 MarkerOptions ,之后在 addMarker 到 map对象即可。
1 | LatLng latLng = new LatLng(latitude, longitude); |
摄像头
当前位置
1 | //获取当前摄像头中心点的坐标 |
移动相关监听
开始监听
1
2
3
4
5
6
7
8
9
10
11
12
13
14
15
16
17//摄像头开始滑动监听
mMap.setOnCameraMoveStartedListener(new GoogleMap.OnCameraMoveStartedListener() {
public void onCameraMoveStarted(int reason) {
if (reason == GoogleMap.OnCameraMoveStartedListener.REASON_GESTURE) {
//表示摄像头移动是为了响应用户在地图上做出的手势,如平移、倾斜、通过捏合手指进行缩放或旋转地图
} else if (reason == GoogleMap.OnCameraMoveStartedListener
.REASON_API_ANIMATION) {
//表示 API 移动摄像头是为了响应非手势用户操作,如点按 zoom 按钮、点按 My Location 按钮或点击标记
} else if (reason == GoogleMap.OnCameraMoveStartedListener
.REASON_DEVELOPER_ANIMATION) {
//表示您的应用已发起摄像头移动
}
}
} ;取消
1
2
3
4
5
6
7//摄像头移动停止状态的监听
mMap.setOnCameraIdleListener(new GoogleMap.OnCameraIdleListener() {
public void onCameraIdle() {
}
});停止
1
2
3
4
5
6
7//摄像头移动中被取消时的监听
mMap.setOnCameraMoveCanceledListener(new GoogleMap.OnCameraMoveCanceledListener() {
public void onCameraMoveCanceled() {
}
});
点击监听
点击
1 | //点击地图上某个坐标 |
长按
1 | //长按地图上某个坐标 |
点击景点
1 | //点击地图上某个景点 |
快照
快照分两种,一种是直接不管地图有没有加载完,就把当前的地图截屏,如果此时地图未加载完,截取的图片会出现模糊的情况;另外一种是判断地图是否在加载中,如果是,则等加载完毕再截图,如果不是,就直接截图。
1 | //是否等待地图加载完毕 |
GoogleApiClient
前提
初始化 GoogleApiClient
在 onCreate 的时候进行初始化操作
1
2
3
4
5
6
7
8
9
10
11
12
13
14
15
16
17
18
19
20
21
22
23
24
25
26
27
28
29
30
31
32
33
34
35
36
37
38
39/**
* 初始化 google client 用于获取地点信息
*/
private void createGoogleApiClient() {
if (mGoogleApiClient == null) {
mGoogleApiClient = new GoogleApiClient
.Builder(this)
.addApi(Places.GEO_DATA_API)
.addApi(Places.PLACE_DETECTION_API)
.addApi(LocationServices.API)
.addConnectionCallbacks(new GoogleApiClient.ConnectionCallbacks() {
public void onConnected(@Nullable Bundle bundle) {
//连接成功
mConnected = true;
}
public void onConnectionSuspended(int i) {
//连接暂停
}
})
.addOnConnectionFailedListener(new GoogleApiClient.OnConnectionFailedListener() {
public void onConnectionFailed(@NonNull ConnectionResult connectionResult) {
//连接失败
mConnected = false;
}
})
.enableAutoManage(this, new GoogleApiClient.OnConnectionFailedListener() {
public void onConnectionFailed(@NonNull ConnectionResult connectionResult) {
//连接失败
mConnected = false;
}
})
.build();
}
}在 onStart() 的时候连接,在 onStop() 的时候,断开连接。
1
2
3
4
5
6
7
8
9
10
11
12
13
14
15
protected void onStart() {
super.onStart();
if (null != mGoogleApiClient) {
mGoogleApiClient.connect();
}
}
protected void onStop() {
super.onStop();
if (null != mGoogleApiClient) {
mGoogleApiClient.disconnect();
}
}使用位置相关 API 的前提,必须确保用户授予位置权限。方法同上的 checkLocationPermission()
获取当前定位的经纬度坐标
科普
WGS-84
国际标准的坐标系,国际标准的 GPS 设备定位获取的就是这种坐标。简称 地球坐标系。
GCJ-02
在我们国家,据说是为了保密,我们不使用 WGS-84 坐标,而是使用经过加密的 GCJ-02,高德地图,谷歌地图(国内板块)都是使用这个坐标系。这个就是俗称的 火星坐标系。
其他坐标系
比如百度地图,他用的是他们家的 BD-09 坐标,这个只适用于百度相关产品。搜狗地图也有自己的坐标。
格式
注意到谷歌地图的坐标是 latitude, longitude 格式,即 纬度,经度 格式。和国内的百度,高德坐标写法是反过来的。国内的一般是 经度,纬度 的方式。
API
1 | Location lastLocation = LocationServices.FusedLocationApi.getLastLocation(mGoogleApiClient); |
刚开始我也以为这么简单就可以了,在测试设备上确实可以获取到坐标,但是实际上,大多数情况,在第一次运行定位的时候,获取的 Location 对象是为null。所以还需要注册位置变化的监听。等监听到位置信息后,移除此监听,防止不断监听引起高耗电现象。这部分百度地图用得很方便,他封装好了,但是谷歌地图就要自己实现。
1 | private long UPDATE_INTERVAL = 10 * 1000; /* 10 secs */ |
现在终于获取到定位坐标了,等等,好像不太对,这个坐标和我实际位置好像有不少的偏差…..我打开了 GoogleMap 这个官方的 APP,点击了他的定位。这下就懵逼了,怎么官方的这个是没问题了,误差很小….
我明明用的是 GoogleMap 的 API,为什么定位会不一样?
原因在刚才的坐标系里面,谷歌地图的国内板块是用 GCJ-02,但是定位 API 获取的坐标是国际标准坐标 WGS-84,所以需要把 WGS-84 转化 GCJ-02。
那谷歌地图 APP 上为什么可以呢?
我猜测,谷歌地图在访问网络的时候,会进行位置判断,如果是国内坐标,就进行转换,国外坐标就不转换。
WGS-84 转化 GCJ-02 方法
1 | static double a = 6378245.0; |
根据经纬度获取附近地点
通过经纬度获取对应的地理位置信息,这个叫做反地理编码请求,以前百度地图有个 API mGeoCoder.reverseGeoCode(mReverseGeoCodeOption);可以直接使用,Google地图也有类似的,只不过在我使用过程中存在 bug。
心急想马上能用的,可以自己调到 Web API 中的 【根据经纬度获取附近地点】章节。
此处存在的问题:如果坐标切换为国外,就会造成获取数据为null。即使修改地区 mGeocoder = new Geocoder(this, Locale.JAPAN) 也无效。
初始化 Geocoder
1
2
3mGeocoder = new Geocoder(this, Locale.getDefault());
//设置区域
//mGeocoder = new Geocoder(this, Locale.JAPAN);在子线程获取数据
1
2
3
4
5
6
7
8
9
10
11
12
13
14List<Address> addressList = mGeocoder.getFromLocation(latitude, longitude, maxResult);
if (null != addressList && addressList.size() > 0) {
//遍历获取附近地点信息
for (Address address : addressList) {
//省
String adminArea = address.getAdminArea();
//市
String city = address.getLocality();
//地址
String feature = address.getFeatureName();
}
} else {
//获取附近地点失败
}
startActivity方式
地点搜索
打开 Activity
private static final int REQUEST_CODE_AUTOCOMPLETE = 2;1
2
3
4
5
6
7
8
9
10
11
12
13
14
15
16
17
18/**
* 打开搜索的 Activity
*/
private void openAutocompleteActivity() {
try {
// MODE_FULLSCREEN 全屏方式启动一个 Activity
// MODE_OVERLAY 启动浮在界面上的控件
Intent intent = new PlaceAutocomplete.IntentBuilder(PlaceAutocomplete.MODE_OVERLAY)
.build(this);
startActivityForResult(intent, REQUEST_CODE_AUTOCOMPLETE);
} catch (GooglePlayServicesRepairableException e) {
GoogleApiAvailability.getInstance().getErrorDialog(this, e.getConnectionStatusCode(), 0).show();
} catch (GooglePlayServicesNotAvailableException e) {
String message = "Google Play Services is not available: " +
GoogleApiAvailability.getInstance().getErrorString(e.errorCode);
Toast.makeText(this, message, Toast.LENGTH_SHORT).show();
}
}在 onActivityResult 回调中获取搜索的地点信息
1
2
3
4
5
6
7
8
9
10
11
12
13
14
15
16
17
18
19
20
21
22
23
24
25
26
27
protected void onActivityResult(int requestCode, int resultCode, Intent data) {
if (requestCode == REQUEST_CODE_AUTOCOMPLETE) {
if (resultCode == RESULT_OK) {
Place place = PlaceAutocomplete.getPlace(this, data);
String placeText = null;
if (null != place) {
placeText = "place.getId() = " + place.getId()
+ "\nplace.getName() = " + place.getName()
+ "\nplace.getLatLng().latitude = " + place.getLatLng().latitude
+ "\nplace.getLatLng().longitude = " + place.getLatLng().longitude
+ "\nplace.getAddress() = " +place.getAddress()
+ "\nplace.getPhoneNumber() = " + place.getPhoneNumber()
+ "\nplace.getLocale() = " + place.getLocale()
+ "\n.......";
}
Toast.makeText(this, getString(R.string.start_by_activity_btn_search_place_result, placeText), Toast.LENGTH_LONG).show();
} else if (resultCode == PlaceAutocomplete.RESULT_ERROR) {
//错误码
Status status = PlaceAutocomplete.getStatus(this, data);
} else if (resultCode == RESULT_CANCELED) {
//取消
}
}
}
导航
1 | /** |
附近地点
获取定位权限
获取方法和前面一样,使用 checkLocationPermission()
打开 Activity,开启附近地点选择
private static final int PLACE_PICKER_REQUEST = 3;1
2
3
4
5
6
7
8PlacePicker.IntentBuilder builder = new PlacePicker.IntentBuilder();
try {
startActivityForResult(builder.build(this), PLACE_PICKER_REQUEST);
} catch (GooglePlayServicesRepairableException e) {
e.printStackTrace();
} catch (GooglePlayServicesNotAvailableException e) {
e.printStackTrace();
}在 onActivityResult 获取选择的地点信息
1
2
3
4
5
6
7
8
9
protected void onActivityResult(int requestCode, int resultCode, Intent data) {
if (requestCode == PLACE_PICKER_REQUEST) {
if (resultCode == RESULT_OK) {
Place place = PlacePicker.getPlace(this, data);
//place.getName() ....
}
}
}
Places
当前位置及附近地点
API
1 | private final int mMaxEntries = 5; |
根据 PlaceID 获取对应地点
在 onResult 返回的 places 一般只有一个,所以取第一个元素,就是 id 对应的地点信息。
1 | /** |
Web API
这里说的 Web API 是指:通过拼接 url 的方式,向 Google 服务器请求数据,服务器会返回一段 JSON,我们本地再用 fastjson 解析,获取对应的数据。
根据坐标获取所在城市
这里的 URL 可以这样拼接
1 | private static final String GOOGLE_MAP_URL = "https://maps.google.com/maps/api/geocode/json?language=%1$s&sensor=true&latlng=%2$s,%3$s"; |
其中 %1$s 对应的是语言,比如我要返回的是中文,那么对于的就是 zh-CN*,%2$s %3$s* 对应的就是纬度和经度。
1 | private static final String DEFAULT_LANGUAGE = "zh-CN"; |
这样,外面只需要直接调这个方法,参数传入纬度、经度,就会返回拼接好的 URL。
获取了 URL,我们就可以异步访问网络,去获取数据了。这里主要讲下思路,详细代码,可以自己查看 Demo。
以Demo为例,拼接的URL为:
1 | https://maps.google.com/maps/api/geocode/json?language=zh-CN&sensor=true&latlng=22.536817569098282,113.97451490163802 |
获取的 JSON 如下
1 | { |
其中 type 对应的值是 locality 的就是城市名字,political 代表政治实体。
关键代码如下:
1 | /** |
根据经纬度获取附近地点
前面获取对应城市中用的 URL 很方便,基本上没有限制。但是获取附近地点的就没这么好了,在拼接 URL 的时候,需要加上谷歌授权给你的 Web API key。这个是官方推荐的做法,详情可以查看官网的介绍
特别注意
这里有一点要特别注意的,这里说的 Web API key 必须要重新申请的。之前我们使用 GoogleMap 的时候已经申请了 KEY,但是选项选择的是【Android apps】,只是作用于 Android Map 相关 API,这个时候访问 Web API 必须重新申请多一个 KEY。申请方法和前面一样,只是选项为【None】即可。
设置完之后如果一般间隔几分钟就可以调用,如果不行,就要手动开启服务。点击此处开启,选择对应的项目,【启用】 Google Places API Web Service 服务。
1 | private static final String GOOGLE_MAP_PLACES_URL = "https://maps.googleapis.com/maps/api/place/nearbysearch/json?language=%1$s&location=%2$s,%3$s&radius=%4$s&type=%5$s&key=%6$s"; |
这下参数有点多了哈,前面3个和之前一样,分别对应语言、纬度、经度。第四个参数是查询地点的半径多大,第五个是类型,这里我使用的是 point_of_interest 意思是已经命名的景点,其他类型可以查看官网,最后一个参数是你的 APP 申请的 Key值。
关键代码如下:
1 | /** |
实战:附近地点推荐
可以像上面那样使用 Activity 的方式,弹出 Google 自带的地点推荐/选取界面,但是这样的UI定制性低,不能按照项目需求显示界面。所以根据上面学习到的东西,我重新写了个类似的界面,实现地点推荐、搜索、选择和截图功能的功能。考虑到频繁调接口会损耗请求次数,所以我设置了个半径,超过半径的才重新请求数据。
限制/收费
前面我把类型分为 Map,Places主要原因就是,他们的收费标准是不同的。详情可见
| Android | 标准方案 | 高级 |
|---|---|---|
| Google Maps Android API | 不受限制地免费使用。1 | 定价基于所需数量。如需了解详细信息,请参阅Premium Plan使用率和限制。 |
| Google Places API for Android | 默认每天 1,000 次免费请求,信用卡验证后可增至每天 150,000 次免费请求。符合要求的应用可免费提升。详情 | —- |
| Web 服务 | 标准 | 高级 |
|---|---|---|
| Google Places API Web Service | 每天 150,000 次免费请求(信用卡验证后)。 | 定价基于所需数量。如需了解详细信息,请参阅Premium Plan使用率和限制。 |
学习资料
官方 Demo
官方 Demo 要跑起来,必须像前面的方式一样,去申请对应的 Key。
android-samples-apiDemos
介绍 Map 相关 API。
android-play-places
介绍 Places 相关 API 。包括地点搜索,附近地点选择,地点补全等。
android-maps-utils
点聚合 Clustering 可以通过这个 demo 学习,GoogleMap的点聚合和百度是一样的用法,外层代码基本上是一样的。
工具类网页
- API Console (Key 管理控制台)
- Google Map API 查询
- 坐标反查 (通过经纬度查对应地点)
GoogleMap
(谷歌地图直接把经纬度输入输入框即可查询,例如输入:22.536817569098282,113.97451490163802 )
高德地图
百度地图
相关参考
[1]官方 Map 教程 https://developers.google.com/maps/documentation/android-api/
[2]官方 Places 教程 https://developers.google.com/places/android-api/
[3]启动 GoogleMap https://developers.google.com/maps/documentation/android-api/intents
[4]Android使用intent调取导航或者地图 https://blog.csdn.net/qwer4755552/article/details/51659833
[5]关于地图和偏移的那些事 https://blog.csdn.net/sanjay_f/article/details/48493699
[6]地图坐标转换大全 http://www.eoeandroid.com/forum.php?mod=viewthread&tid=332419
[7]Show Popup when Location access is disable by user (Andorid Google Maps) https://stackoverflow.com/questions/24160472/show-popup-when-location-access-is-disable-by-user-andorid-google-maps
[8]How to show enable location dialog like Google maps? https://stackoverflow.com/questions/29801368/how-to-show-enable-location-dialog-like-google-maps